Recessed Lighting Installation Cost 2026: $125–$300 Per Light
Recessed lighting installation costs $125–$200 per light in existing wiring, $200–$300 in new construction. A 6-light living room installation runs $750–$1,800. Pricing by access and circuit distance.
Recessed lighting installation costs $125–$300 per light installed by an electrician. A typical living room with 6 lights runs $750–$1,800. New construction or accessible attic installs are cheaper ($100–$200/light); retrofitting into finished ceilings with no attic access costs $200–$400/light due to fishing wires through finished walls. The light fixtures themselves cost $10–$80 each; labor is the dominant cost.
Frequently Asked Questions
How much does recessed lighting installation cost?
Electrician labor for recessed lighting runs $50–$100/hr plus materials. Each light takes 1–2 hours to install, so expect $100–$200/light in labor. New construction (open joists, easy wire runs): $100–$175/light. Retrofit in a finished ceiling with attic access: $150–$250/light. Retrofit in a finished ceiling without attic access (fishing wires through finished walls): $250–$450/light. For a 6-light living room installation in a finished home with attic access, total cost runs $900–$1,800.
How many recessed lights do I need per room?
The standard rule: divide ceiling height by 2, then space lights that distance apart. For an 8-foot ceiling, space lights 4 feet apart from each other and 2 feet from walls. For a 10×14 foot living room, this yields 6–8 lights. In kitchens, place lights 2 feet from walls and 4 feet apart, centering a light over each work zone (sink, countertop prep area, stove). Bathroom over the vanity: two 4-inch lights centered over the mirror provides good task lighting without harsh shadows. More lights at lower wattage produces better, more even light than fewer high-wattage fixtures.
What is the cost difference between new construction and retrofit recessed lighting?
New construction (IC-rated, attached housing, before drywall): $10–$30 per fixture in materials, $50–$75/hr labor, total $75–$150/light. Retrofit (remodel) with attic access: $15–$50 fixture, $75–$100/hr labor, total $150–$250/light. Retrofit without attic access: electrician must fish wires through finished walls — $200–$450/light depending on wall material and wire path complexity. Accessible attic access is the single biggest cost variable; popcorn ceilings or concrete (vs. drywall) add to retrofit difficulty.
Can I install recessed lighting myself?
New construction (open joists, before drywall): DIY-accessible with basic electrical knowledge. Retrofit with attic access: possible for experienced DIYers — cut holes, connect wiring in the attic, install trim. Retrofit without attic access: requires fishing wires through finished walls, which needs experience with wall construction and drywall patching. All electrical work typically requires a permit and inspection in most jurisdictions — verify before starting. The main safety risk is working on live circuits: always verify power is off at the breaker with a voltage tester before touching any wiring.
What type of recessed lighting is best: LED wafer lights or can lights?
Traditional can lights (housing + trim + bulb) work well for new construction and attic-access retrofits. Modern LED wafer lights (slim profile, no housing — just a junction box) are better for retrofits in tight spaces: they're only 0.5–1 inch deep, install in 30 minutes per light, draw 9–12 watts, and are dimmable. The Halo SLD6 and Sunco Lighting 6-inch slim are the most-installed DIY retrofit options ($15–$25 per light at big-box stores). For new construction, traditional IC-rated housings offer more control over placement and are required in insulated ceilings.
How do I add recessed lighting without attic access?
Without attic access, electricians fish wire through finished walls: cut a small access hole at a switch location, drill through wall plates and joists using a flexible drill bit, and pull new wire to each fixture location. The wire run path is often through the inside of walls where it can't be seen. This works but takes more time (1–3 hours per light vs. 45 minutes with attic access), which is why the cost per light doubles. LED wafer lights reduce this complexity — they connect to a junction box and don't require a full housing in the ceiling, just a connection to an existing circuit.
Recessed lighting installation costs $125–$300 per light installed by an electrician. A typical living room with 6 lights runs $750–$1,800.
Recessed lighting is the most popular electrical upgrade in existing homes — cleaner than surface-mounted fixtures, better light distribution than floor lamps, and modern LED options that use 75% less energy than the incandescent can lights they replace.
Recessed Lighting Cost by Installation Type
| Installation Type | Per Light | 6-Light Room |
|---|---|---|
| New construction (open joists) | $100–$175 | $600–$1,050 |
| Retrofit with attic access | $150–$275 | $900–$1,650 |
| Retrofit, no attic access | $275–$450 | $1,650–$2,700 |
| LED wafer retrofit (DIY) | $15–$35 material | $90–$210 |
Fixture Type Cost Comparison
| Type | Unit Cost | Labor Friendly | Best For |
|---|---|---|---|
| LED slim wafer (e.g., Halo SLD6) | $15–$35 | Very (30 min/light) | Retrofit, no attic |
| Traditional can housing (IC-rated) | $20–$60 | Easy with attic access | New construction |
| Adjustable/gimbal recessed | $25–$80 | Same as can | Art walls, accents |
| Smart LED recessed (Lutron, Philips) | $30–$70 | Same as standard | Automation setups |
Wiring Cost: The Hidden Variable
Adding recessed lighting to an existing circuit is straightforward. Running a new circuit from the breaker panel (if needed) adds significant cost:
- Extend existing circuit (same room): $0–$200 extra
- New 15A circuit from panel (same floor): $200–$500
- New circuit with long wire run (different floor): $400–$900
- Subpanel upgrade (if main panel is full): $1,000–$3,000
Most rooms have sufficient existing circuit capacity for LED recessed lights. An electrician can assess during a site visit ($75–$150 service call) and tell you what’s needed before committing.
LED vs. Incandescent Recessed Lights
| Factor | LED | Incandescent/Halogen |
|---|---|---|
| Wattage | 9–15W | 65–75W |
| Lifespan | 25,000–50,000 hours | 1,000–2,000 hours |
| Heat output | Low | High (IC rating critical) |
| Dimming | Requires LED dimmer | Standard dimmer works |
| Energy cost/year (1 light, 4hr/day) | $2–$4 | $12–$20 |
LED pays back its price premium over incandescent within 1–2 years in energy savings. Any new recessed lighting project should use LED exclusively.
Regional Cost Variations
Electrician labor rates drive most regional price differences for recessed lighting:
| Region | Per Light (Retrofit, Attic Access) | 6-Light Room |
|---|---|---|
| Northeast (NY, MA, NJ) | $200–$400 | $1,200–$2,400 |
| Mid-Atlantic (DC, MD, VA) | $175–$350 | $1,050–$2,100 |
| Southeast (FL, GA, TX) | $125–$250 | $750–$1,500 |
| Midwest | $130–$265 | $780–$1,590 |
| Pacific (CA, WA, OR) | $190–$380 | $1,140–$2,280 |
New construction or open-joist installs run 30–40% less than the retrofit prices above. Retrofits without attic access add $100–$200 per light for wire fishing through finished walls.
LED Slim Wafer Brand Comparison
LED slim wafer lights (the retrofit standard) are sold by several brands with different quality tiers:
| Brand | Model | Price/Light | CFM Rating | Warranty | Notes |
|---|---|---|---|---|---|
| Halo SLD6 | 6-inch slim LED | $15–$25 | 650–750 lm | 5-year | Best-reviewed overall; Home Depot exclusive |
| Sunco Lighting | 6-inch slim LED | $10–$18 | 650 lm | 5-year | Budget-friendly, solid reliability |
| Philips SceneSwitch | 6-inch slim | $18–$30 | 700 lm | 3-year | Color temp adjustable without dimmer |
| Kichler Satin | 6-inch slim | $20–$35 | 650–750 lm | 5-year | Better finish quality for visible trims |
| Acuity Brands | 4-inch slim | $12–$22 | 450 lm | 5-year | Better for tighter spacing in smaller rooms |
Halo SLD6 vs. budget brands: the Halo SLD6 consistently outperforms no-name units in color consistency and dimming performance. The $5–$10 premium per light is worth it for any visible application — 6 lights at $20 vs. $12 saves $48 and risks uneven color temperature across the room.
Dimmer Switch Compatibility
Recessed LED lighting requires an LED-compatible dimmer — most standard dimmers cause buzzing or flickering:
| Brand | Model | Price | Compatibility | Best For |
|---|---|---|---|---|
| Lutron Caseta PD-6WCL | Smart wireless | $55–$75 | Universal LED | Smart home setups |
| Leviton DSL06 | Standard LED dimmer | $20–$35 | Wide LED support | Budget retrofit |
| Lutron Skylark S-600P | Toggle LED dimmer | $15–$25 | Most LEDs | Simple replacement |
| Legrand Adorne | Designer dimmer | $40–$65 | LED compatible | Upscale kitchens |
Match the dimmer to the fixture: fixture manufacturers publish compatibility lists online. Halo SLD6 is compatible with most Lutron and Leviton dimmers.
Room-by-Room Lighting Recommendations
| Room | Recommended Layout | CFM/Count | Notes |
|---|---|---|---|
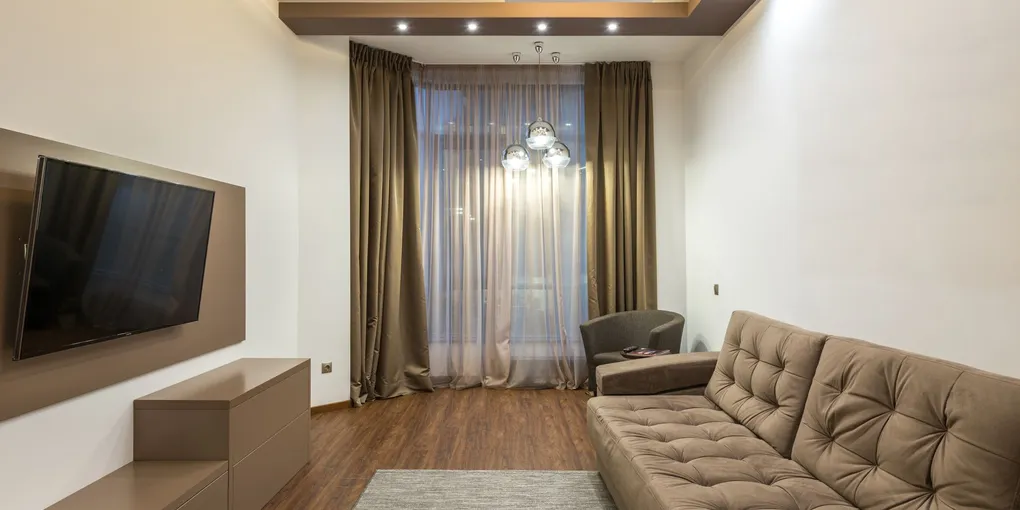
| Living room (12×14 ft, 8 ft ceiling) | 6 lights, 4-ft grid | 600 lm each | Supplement with accent lighting at perimeter |
| Kitchen (10×12 ft) | 6–8 lights + under-cabinet | 650–750 lm | Center lights over work zones |
| Bedroom (10×12 ft) | 4–6 lights | 500–600 lm | Add bedside table lamps for task light |
| Bathroom (5×8 ft) | 2–4 lights + vanity | 600–700 lm | 2 lights flanking mirror vs. overhead for vanity |
| Hallway (4×16 ft) | 4 lights, 4-ft spacing | 450–600 lm | One circuit, one switch |
Questions to Ask Your Electrician
- Will you need to run a new circuit or can you tap an existing one? — existing circuit capacity affects both price and project scope
- What type of wire fishing will be needed? — attic access vs. through finished walls changes cost significantly; ask the electrician to confirm before quoting
- Are the fixtures IC-rated and airtight? — any ceiling with insulation above requires IC-rated fixtures; ask to verify the specific product spec
- What dimmer switch are you using? — should specify an LED-compatible brand (Lutron or Leviton); incompatible dimmers cause buzzing within days
- Do you pull permits for this work? — most jurisdictions require electrical permits; a licensed electrician should handle the permit as part of the job
DIY supplies (if you tackle it yourself)
- LED recessed lights 6-inch
- LED retrofit kit (for existing cans)
- Recessed light dimmer switch
- Wire nuts and electrical tape
Related Reading
- How to Install Recessed Lighting
- Light Fixture Installation Cost
- Electrician Cost
- How Much Does It Cost to Install a Ceiling Fan
- Electrical Panel Upgrade Cost
- Kitchen Remodel Cost
- Outdoor Lighting Installation Cost — extend the lighting project outside; $100–$400 per fixture
- How to Install a Ceiling Fan With No Existing Wiring
- Plan the layout with a scale drawing before cutting any holes
On graph paper or a digital tool, draw your room to scale and mark joist direction (lights cannot go exactly where joists run — you need the space between them). Standard layout: lights spaced half the ceiling height apart, starting two feet from walls. For a room with 8-foot ceilings, mark a 4-foot grid, offset 2 feet from walls. Joist spacing is typically 16 or 24 inches — use a stud finder to locate them. Each light must land between joists, not on one. Plan the wire run path from the circuit (usually an existing switch or outlet) to each light before cutting.
- Choose the right fixture type for your ceiling before buying
Insulated ceiling (IC-rated required): If your ceiling has insulation above it (almost all finished homes), the fixture MUST be IC-rated (Insulation Contact). Non-IC fixtures get hot enough to ignite insulation. Check the spec sheet before buying. Airtight rating (AT): In climate-controlled homes, also use airtight-rated fixtures to prevent conditioned air from escaping into the attic. Most modern LED retrofit wafers are both IC and airtight. Ceiling thickness: LED wafer lights need only a junction box — ideal for very thin ceilings (under 2 inches clearance). Traditional can lights need 6–8 inches of clearance above the ceiling.
- Verify the circuit can handle the additional load before connecting
Each 15A circuit can handle 1,440 watts safely (80% of 1,800W). LED recessed lights draw 9–15 watts each — 20 lights = 180–300 watts, well within one circuit. Incandescent or halogen equivalents (65–75 watts per bulb) fill a circuit much faster — 10 incandescent recessed lights = 650–750 watts. If adding more than 10 lights or if the circuit is already heavily loaded (other lights, outlets), add a new dedicated circuit ($200–$500 from panel). An electrician can assess the existing circuit load in 15 minutes during a site visit.
- Use a dimmer switch designed for LED — standard dimmers cause flickering
LED lights require LED-compatible dimmers (also called ELV or LED trailing edge dimmers). A standard incandescent dimmer on LED bulbs causes flickering, buzzing, or incomplete dimming range. The Lutron Caseta series (smart dimmer, $55–$80) and Leviton Decora ($20–$35 for standard LED dimmer) are the most reliable LED dimmer options. Confirm the dimmer is compatible with your specific LED fixture — many manufacturers publish a compatibility list on their website. If your lighting already has a dimmer switch, check the brand and model before assuming LEDs will work with it.
- Test for power at every hole before cutting — live wires in unexpected places are common
In older homes especially, wires may run in unexpected paths through the ceiling. Before cutting each fixture hole, probe the area with a non-contact voltage tester through the planned hole location. Scan slowly — if the tester beeps, there's a live wire nearby. In bathrooms, GFCI circuits are required and the wire path may cross the area you're cutting. Electrical code requires at least 6 inches of clearance between a light housing and any insulation batts not rated for direct contact. Use a stud finder with AC detection mode as an initial pass before drilling.
Free: 10-Point Home Maintenance Checklist
Prevent costly repairs with this seasonal checklist. Save hundreds every year by catching problems early.
Your checklist is ready!
Open Checklist →Something went wrong. View the checklist here.