How to Build a Retaining Wall: Block, Timber, and Stone Options for DIYers
Step-by-step guide to building a DIY retaining wall using concrete block, timber, or natural stone — with full coverage of drainage, base prep, and permit requirements.
The single most important rule for any retaining wall is drainage. Hydrostatic pressure — water trapped behind a wall — is the number one reason retaining walls fail, buckle, and tip. Get the drainage right first. Everything else follows.
Frequently Asked Questions
How tall can a retaining wall be without a permit?
In most jurisdictions, walls under 3 to 4 feet tall (measured from the base of the footing to the top of the wall) do not require a building permit. However, this varies by city and county — some require permits for anything over 2 feet, others allow up to 4 feet. Walls taller than 4 feet almost universally require a permit and often an engineer's stamp. Check with your local building department before starting.
What is the easiest retaining wall to build yourself?
Interlocking concrete block (such as Allan Block or similar gravity-wall systems) is the easiest option for most DIYers. The blocks are designed to stack without mortar, interlock front-to-back for stability, and are available at most big-box stores. They are heavy but manageable, and the system is forgiving of minor errors.
Do I need drainage behind a retaining wall?
Yes, always. Water that builds up behind a wall creates hydrostatic pressure that can push over even a well-built structure. At minimum, use a 12-inch wide layer of clean crushed gravel as backfill behind the wall and a perforated pipe at the base to carry water away. Without drainage, most walls fail within 5 to 10 years regardless of how well they were built.
How deep should a retaining wall footing be?
The first course of block should be buried a minimum of 1 inch for every 8 inches of exposed wall height. For example, a 24-inch tall wall needs 3 inches of the first course below grade. For cold climates with significant frost, burying the first course 6 to 12 inches is better practice to prevent frost heave from lifting the base. The footing sits on 4 to 6 inches of compacted gravel, not on bare soil.
How do I keep a retaining wall from leaning?
Three things: a solid compacted gravel base, proper batter (tilting the wall face 1 inch back for every 1 foot of height), and deadmen anchors for walls taller than 24 inches. Deadmen are anchor blocks or timbers that extend perpendicular into the hillside, tying the wall to the retained soil mass. They are required by most block manufacturers for walls over 24 to 36 inches. Also, adequate drainage eliminates the hydrostatic pressure that pushes walls forward.
What is the difference between a retaining wall and a garden wall?
A retaining wall holds back earth and manages grade changes — it is a structural element under constant lateral pressure from soil and water. A garden wall (also called a freestanding wall) is decorative and stands on flat ground with no soil pressure on either side. Retaining walls require compacted gravel bases, drainage systems, and often deadmen anchors. Garden walls require much less engineering and can be simpler builds.
At what height does a retaining wall require a structural engineer?
Most jurisdictions require an engineer's stamp on walls exceeding 4 feet in total height (footing base to wall top). Walls over 6 feet almost always require both a permit and a licensed engineer's design — the calculations for soil pressure, drainage capacity, and deadman anchor sizing at that height are beyond standard DIY reference tables. Additional triggers that reduce the allowable height: surcharge loads above the wall (a driveway, parking area, or structure within 1.5x the wall height increases lateral pressure dramatically); seismic zones (California and Pacific Northwest have stricter requirements); and expansive soils (clay-heavy soils exert significantly more lateral pressure than sandy or gravelly soils).
Is it cheaper to build one tall retaining wall or step it into two shorter walls?
Stepping into two or more shorter terraced walls almost always costs less and lasts longer than one tall wall. Two 2-foot walls handle the same 4-foot grade change as a single 4-foot wall — but each shorter wall is permit-exempt in most jurisdictions, uses far less material (wall height has an outsized effect on material cost because deeper footings and more rows of block multiply quickly), and eliminates the need for deadman anchors. The design rule: step back at least 1 foot horizontally for every 1 foot of combined wall height between terraces. For a 4-foot grade change: build a 2-foot front wall, step back 2 feet, build a 2-foot rear wall. The terrace space between walls becomes useful planting area.
The single most important rule for any retaining wall is drainage. Hydrostatic pressure — water trapped behind a wall — is the number one reason retaining walls fail, buckle, and tip.
Most retaining walls don’t fail because they were built wrong — they fail because water was never given anywhere to go. The soil behind a wall holds moisture, that moisture creates pressure, and over time the wall slowly tips, buckles, or blows out entirely. Drainage isn’t the last step of the project; it’s the design constraint that drives everything else. Get that right and the rest of the build is straightforward.
A properly built retaining wall also adds real value. A well-graded yard with a solid retaining wall turns an unusable slope into level outdoor space for a patio, garden bed, or lawn. Done well, it lasts 20 to 50 years depending on materials.
Wall Type Comparison
| Wall Type | DIY Difficulty | Estimated Cost (per linear ft) | Lifespan | Notes |
|---|---|---|---|---|
| Concrete Interlocking Block | Easy | $25–$50 | 30–50 years | Most DIY-friendly; no mortar needed |
| Pressure-Treated Timber | Easy–Medium | $15–$30 | 15–25 years | Shorter lifespan; good for informal borders |
| Natural Stone (dry-stacked) | Medium–Hard | $40–$80 | 50–100 years | Heavy; requires skill to lay stable |
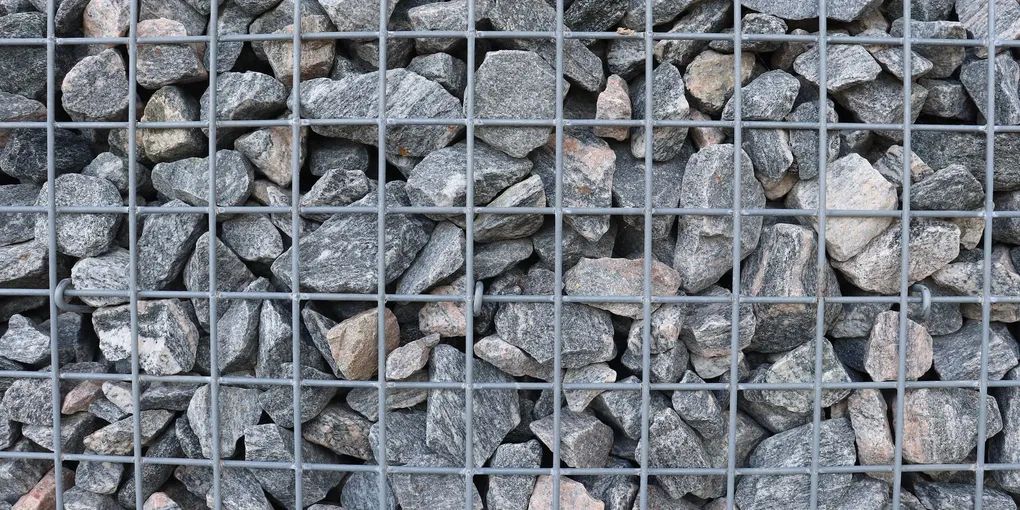
| Gabion (wire cages + rock) | Medium | $20–$45 | 30–50 years | Excellent drainage; industrial look |
Concrete interlocking block (Allan Block, Versa-Lok, and similar systems) is the right call for most DIY projects. The geometry is engineered for you — the blocks have a built-in rear lip that sets the batter automatically, and they interlock without mortar. You can get matching cap blocks for a clean top edge. Allan Block systems are available on Amazon and at most major home improvement stores.
Pressure-treated timber is cheaper per linear foot and easier to source, but it has a shorter lifespan than masonry. Use it for informal garden borders and low walls (under 18 inches). Drainage is still required.
Natural stone looks the best but is the hardest to build correctly. Each stone must be chosen and placed for stability. Better for experienced masons or as a low decorative wall.
Gabion walls are wire mesh cages filled with rock. They drain by nature (no additional drainage layer needed), handle slope movement well, and are surprisingly affordable if you have access to local rock.
Planning and Permits
Check Local Requirements First
Before buying a single block, call your local building department. Walls under 3 to 4 feet rarely require permits, but this varies. In earthquake-prone areas, seismic requirements may apply even to short walls. In areas with groundwater or drainage easements, additional restrictions may apply.
When in doubt, call — a permit conversation is free. A fine for an unpermitted wall (especially one that fails and causes property damage to a neighbor) can run $500 to $5,000.
Survey the Area
- Locate underground utilities by calling 811 (free). Mandatory before any excavation.
- Identify water flow patterns on the slope — where does runoff go during a rain event?
- Check proximity to property lines (setbacks usually 1 to 3 feet)
- Note any large trees near the wall line — roots complicate installation
Estimate Materials
For a concrete block wall, calculate linear footage times number of courses. Most standard retaining wall blocks are 6 inches tall, so a 24-inch wall requires 4 courses. Manufacturers publish block calculators on their websites — use them. Add 10% for waste and cuts.
What You Need
Materials
- Allan Block or equivalent interlocking block — sized for your wall height
- Crushed gravel / paver base — for the base layer and drainage backfill
- Perforated drainage pipe — runs along the base of the wall behind it
- Landscape fabric — separates soil from gravel drainage zone
- Wall block adhesive — for the cap course; optional but recommended for wind-prone areas
- Cap blocks — for the finished top course
Tools
- Plate compactor — rent one; critical for base preparation
- Shovel and tamper
- Level (4-foot recommended)
- Rubber mallet
- Tape measure
- Mason line and stakes
- Masonry chisel or block splitter (for cuts)
- Work gloves and safety glasses
Foundation and Base (The Most Critical Step)
This is where most amateur retaining walls fail. Rushing the base setup produces a wall that looks fine for two seasons and fails in the third.
Step 1: Excavate
Dig out the base trench along the full wall line. The trench should be:
- Wide: At least 24 inches (the depth of the block + 12 inches for gravel drainage behind it)
- Deep enough: Allow for 4 to 6 inches of compacted gravel base, plus enough depth to bury the first course of block. For a 24-inch exposed wall, the first course should sit 3 inches below finished grade — so total trench depth is roughly 9 to 12 inches at minimum.
The trench base should be level along its entire length. Use your 4-foot level and mason line to check. A base that’s off by 2 inches will throw every course above it off.
Step 2: Install Compacted Gravel Base
Add crushed compactable gravel (3/4-minus or “paver base”) in the trench:
- Spread in 2-inch lifts
- Compact each lift with the plate compactor
- Build to 4 to 6 inches of compacted depth
This base layer is doing the structural work. Uncompacted or sandy soil under the first course means the wall will settle unevenly. Hand tamping is not sufficient for anything more than a decorative garden border — rent the plate compactor.
Step 3: Lay the First Course
The first course of block is your reference for every course above it. Take your time here.
- Set blocks on the compacted gravel
- Level each block front-to-back and side-to-side
- Confirm the run is level along its entire length with a mason line
- The first course should sit at or just below finished grade — this buries the rough base and gives the wall its visual starting point
Check level after every 3 to 4 blocks. Adjust gravel underneath individual blocks as needed. Once this course is set correctly, the rest of the wall is essentially just stacking.
Building Up
Batter (Backward Lean)
Retaining walls should lean slightly into the hillside — this is called batter. Most interlocking block systems build batter in automatically through the block geometry (typically 1 inch of setback per course). If your system requires you to set batter manually, maintain approximately 1 inch of setback per foot of wall height.
Batter improves structural resistance to the soil pressure behind the wall. A wall built perfectly vertical will lean outward over time. Batter compensates for this.
Stagger the Joints
Each course should be offset from the one below by half a block length (running bond pattern). This distributes load and interlocks the courses structurally. Block systems usually self-align — the rear lip of each block drops into the one below.
Deadmen Anchors for Taller Walls
For any wall taller than 24 to 36 inches, deadmen anchors are required by most manufacturers and most building codes.
A deadman is an anchor block (or timber, for wood walls) that extends perpendicular back into the hillside at full wall depth — typically 5 to 7 feet behind the wall face. It connects to the wall and is buried in the gravel backfill. Every manufacturer publishes specific deadman spacing requirements — follow them exactly for your wall height.
Install deadmen at one-third to one-half the wall height. For a 48-inch wall, that’s 18 to 24 inches above the base. Space them every 6 to 8 feet along the wall length.
Skipping deadmen on any wall over 24 inches is the second most common cause of wall failure, after inadequate drainage.
Drainage (Skip This and the Wall Will Fail)
This section is not optional. Every retaining wall traps soil and water on the hillside side. Without drainage, that water has nowhere to go except to push against the back of your wall.
Landscape Fabric Liner
Before backfilling with gravel, drape landscape fabric against the back of the wall and along the excavated hillside face. The fabric separates your clean drainage gravel from the surrounding native soil. Without it, fine soil particles migrate into the gravel over years and eventually clog the drainage zone.
Perforated Pipe at the Base
Lay a perforated drainage pipe along the base of the wall, behind the first course, on top of the compacted gravel base. The pipe runs the full length of the wall and exits at one or both ends to daylight (the open ground beyond the wall end where water can discharge freely).
Orient the pipe with perforations facing down or to the sides — not up. Water drains through the gravel down to the pipe and exits at the ends.
Gravel Backfill Zone
Backfill the area directly behind the wall with clean crushed gravel — at minimum 12 inches wide for the full height of the wall. Do not backfill directly with native soil against the wall face. The gravel zone allows water to drain freely down to the perforated pipe instead of building up pressure against the wall.
Compact each 6-inch lift of gravel with the plate compactor as you build up the wall courses. Do not compact directly behind the wall face (you may disturb the blocks) — compact 2 to 3 feet back from the wall.
Cap Off the Top
At the top of the wall, fold the landscape fabric over the top of the gravel drainage zone before backfilling with soil. This prevents native soil from washing down into the gravel layer during rain events.
Where Drainage Goes
The perforated pipe outlet should discharge to a spot where water won’t damage anything — a swale, a downslope area, or a dry creek bed. Never discharge directly toward a neighbor’s property or a structure foundation.
If you can’t get outlet location right, talk to a drainage contractor before building. Trapped water that can’t exit the pipe is almost as bad as no pipe at all.
Related Reading
- How to Lay a Paver Patio — build a level patio at the base of your retaining wall
- How to Build a Raised Garden Bed — terraced raised beds above a new wall
- How to Landscape a Backyard — full yard planning once grading is done
- How to Fix a Broken Retaining Wall — repair leaning, cracked, or bulging retaining walls before full failure
- Wall Type Comparison
Select the right wall type before starting: interlocking concrete block for most DIY projects, pressure-treated timber for informal garden borders, natural stone for premium aesthetics, or gabion for excellent drainage.
- Foundation and Base (The Most Critical Step)
This is where most amateur retaining walls fail. Rushing the base setup produces a wall that looks fine for two seasons and fails in the third.
- Drainage (Skip This and the Wall Will Fail)
This section is not optional. Every retaining wall traps soil and water on the hillside side. Without drainage, that water has nowhere to go except to push against the back of your wall.
Free: 10-Point Home Maintenance Checklist
Prevent costly repairs with this seasonal checklist. Save hundreds every year by catching problems early.
Your checklist is ready!
Open Checklist →Something went wrong. View the checklist here.