How to Re-Caulk a Shower: Removing Old Caulk and Applying New for a Clean Seal
Complete guide to re-caulking a shower — removing deteriorated caulk, cleaning the joint, and applying new silicone caulk for a watertight, mold-resistant seal.
Re-caulking a shower: (1) Remove old caulk completely — use a caulk remover tool or utility knife, then clean with a caulk remover solution (Goo Gone or acetone). New caulk over old caulk will fail within months. (2) Clean and dry the joint thoroughly — any moisture prevents adhesion. Let dry 24 hours after cleaning. (3) Apply painter's tape along both sides of the joint for clean lines. (4) Load a tube of 100% silicone caulk (not latex — silicone is waterproof and mold-resistant). Cut the tip at 45 degrees. (5) Apply in one continuous bead, moving the gun at a steady speed. (6) Smooth immediately with a wet finger — silicone is unforgiving once it starts to skin. (7) Remove tape while caulk is still wet. (8) Do not use the shower for 24 hours. Use mold-resistant silicone for corners and joints; caulk is correct for any joint where two surfaces meet — grout is for tile-to-tile gaps only.
Frequently Asked Questions
How often should shower caulk be replaced?
Most shower caulk lasts 5-10 years before it cracks, shrinks, or develops mold that won't scrub out. In heavy-use showers or humid bathrooms without good ventilation, you may need to re-caulk every 3-5 years. Don't wait for visible gaps — if the caulk is discolored through its core, peeling at edges, or no longer adhering to both surfaces, it's time.
What type of caulk should I use for a shower?
Use 100% silicone caulk for shower joints, especially at the pan-to-wall seam. Silicone won't crack or shrink, stays flexible as the shower flexes with temperature changes, and resists mold far better than latex. Siliconized latex (a blend) is easier to tool and accept paint, but isn't as durable in standing-water zones. Never use standard acrylic caulk in a shower — it will fail within months.
How do I remove old caulk without scratching tile?
Use a plastic scraper or a dedicated caulk removal tool rather than a metal blade on tile surfaces. Apply a caulk softener spray and let it soak for 2-4 hours first — this loosens the bond dramatically and reduces how hard you have to work the tool against the tile. On fiberglass or acrylic surrounds, plastic tools are mandatory; metal will scratch.
How long do I have to wait after caulking before using the shower?
100% silicone caulk needs 24 hours minimum before water contact, and 48-72 hours for a full cure in cool or humid bathrooms. Rushing this is the most common reason new caulk fails — water penetrates before the caulk has set, and it never bonds properly. Check the product label: some fast-cure silicones claim 3-hour water resistance, but 24 hours is safer.
Why does my new caulk keep getting moldy?
Mold in new caulk almost always has two causes: the joint wasn't completely dry before caulking (trapping moisture inside), or ventilation is poor. Silicone itself doesn't support mold, but soap scum and mineral deposits on the surface do. Run your exhaust fan for 20 minutes after every shower, and wipe the caulk line dry after bathing. Look for caulk with built-in mildewcide — brands like GE Sealants label it explicitly.
Can I caulk over old caulk in a shower?
No. Caulking over old caulk seems faster but doesn't work — the new caulk bonds to the old surface, not to the tile and pan, so it peels away at the same rate as the original. Remove all old caulk completely, clean and dry the joint, then apply new caulk directly to the substrate. The extra 30-60 minutes of removal work is the difference between a seal that lasts 5+ years and one that fails in 6 months.
Re-caulking a shower: (1) Remove old caulk completely — use a caulk remover tool or utility knife, then clean with a caulk remover solution (Goo Gone or acetone). New caulk over old caulk will fail within months.
Water behind shower walls is one of the most expensive damage patterns in a home. It doesn’t happen from obvious floods — it happens slowly, through failed caulk at the shower pan seam, through hairline cracks that look fine until the wall behind them is rotted. Re-caulking a shower is a 2-3 hour project that costs under $20 in materials. It is also the repair most homeowners put off until the damage is already done.
This guide covers every step: removing old caulk without scratching surfaces, drying the joint properly, choosing the right product, applying a clean bead, and preventing mold from returning.
Signs Your Shower Caulk Needs Replacement
Any one of these is enough reason to act:
- Caulk is pulling away from tile or the shower pan — even a hairline gap lets water in
- Black or gray discoloration that doesn’t scrub out with bathroom cleaner
- Caulk is cracking, crumbling, or has chunks missing
- The caulk line looks sunken or concave (it has shrunk and lost its seal)
- You can press the caulk and it feels hard or brittle rather than slightly flexible
- Water is seeping behind the wall — a wet spot on the ceiling below, or a soft drywall section near the shower
If you see any mold on walls behind the shower surround, remove the caulk and inspect the joint before re-caulking. Re-caulking over active moisture intrusion traps the problem rather than fixing it.
Choosing the Right Caulk
Not all caulk sold in the caulk aisle is appropriate for shower use. Here is a direct comparison:
| Type | Best For | Water Resistance | Flexibility | Mold Resistance | Paintable |
|---|---|---|---|---|---|
| 100% Silicone | Shower pan seam, wet zones | Excellent | Excellent | Excellent | No |
| Siliconized Latex | Tile corners, semi-wet areas | Good | Good | Good | Yes |
| Acrylic/Latex | Drywall joints, baseboards | Poor | Poor | Poor | Yes |
| Grout | Tile field joints | Good (when sealed) | None — cracks | Moderate | No |
The rule: use 100% silicone at the shower pan-to-wall joint and any horizontal joint that holds standing water. Use siliconized latex for upper wall corner joints where you want paintability. Never use grout in corner joints — corners flex, grout does not, and it will crack within months.
For the shower pan seam specifically, GE Sealants Silicone II Kitchen & Bath is the standard recommendation — clear or white, built-in mildewcide, widely available, and genuinely durable.
What You Need
For removal:
- Oscillating tool with caulk removal blade — fastest method on old, hardened silicone
- Caulk softener spray — apply first to loosen the bond
- Plastic scraper or utility knife with fresh blade
- Rubbing alcohol (isopropyl 70% or higher)
- Clean rags or paper towels
For application:
- Dripless caulk gun — standard caulk guns drip and cause mess; dripless guns have a release that stops flow when you stop squeezing
- 100% silicone caulk (GE Sealants Silicone II or equivalent)
- Caulk smoothing tool kit — or a wet finger for tooling the bead
- Painter’s tape — for clean edges
- Cup of water with a drop of dish soap (for wetting your smoothing tool)
Optional:
- Razor blade scraper (for glass surfaces — careful on tile)
- Denatured alcohol (stronger than isopropyl for cleaning silicone residue)
Step 1: Remove All Old Caulk
This step takes the most time and is the one people rush. Do not rush it.
Apply softener first. Spray caulk softener along the entire caulk line. Let it sit for at least 2 hours — 4 hours is better for old, hardened silicone. This breaks down the bond and makes removal dramatically easier.
Mechanical removal. Use an oscillating tool with a caulk removal blade for speed, or a plastic scraper for more control. Work at a shallow angle to avoid gouging tile. Pull the caulk away in strips where possible — long strips are easier than scraping in place.
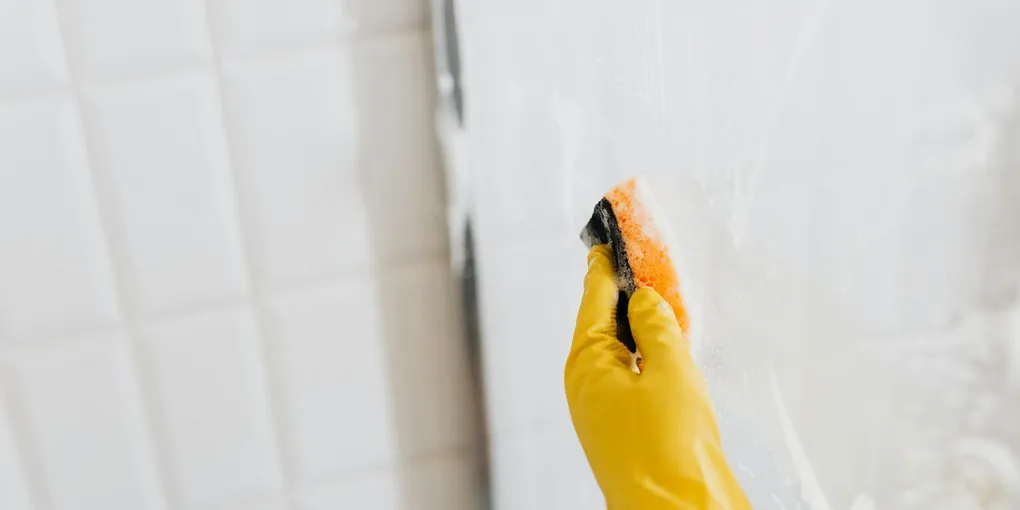
Scrape the residue. After the bulk is removed, use a fresh utility knife blade or plastic scraper to remove any remaining caulk film from both surfaces. Every bit of old caulk left behind is a weak point for the new seal — new silicone bonds to tile and pan, not to old caulk.
Clean with alcohol. Wipe the joint thoroughly with rubbing alcohol on a clean rag. This removes soap residue, grease, and any remaining caulk film. Silicone will not adhere to a contaminated surface. Let the alcohol evaporate completely before moving on.
Step 2: Dry Completely
This is the step that most failed re-caulk jobs have in common: the joint was not dry.
After cleaning with alcohol, the joint needs to be completely dry before caulk goes in. For a shower used daily, this means:
- Do not use the shower the night before you plan to caulk
- After cleaning, let the joint air-dry for a minimum of 2 hours
- If the bathroom is humid or the joint runs along the floor where water pools, let it dry overnight
- For stubborn dampness, use a hair dryer on low to dry the joint thoroughly — then wait 30 more minutes
If there is any moisture in the joint, the silicone will not bond to both surfaces and will peel away from one side within weeks.
Step 3: Tape and Apply
Tape the lines. Run painter’s tape along both sides of the joint — one strip on the tile, one on the shower pan. Leave the gap of the joint exposed. Tape creates clean edges and prevents silicone from smearing across the tile face.
Load the caulk gun. Cut the caulk tube nozzle at a 45-degree angle, making the opening about 3/16 inch in diameter — slightly smaller than the joint width. Puncture the inner foil seal with a wire or nail. Load into the dripless caulk gun.
Apply the bead. Hold the gun at a 45-degree angle to the joint. Apply consistent, steady pressure while moving at an even pace. The goal is a bead that slightly overfills the joint — you’ll tool it into the gap in the next step. Do the entire length of one joint before stopping. Avoid starting and stopping in the middle of a run; the joint at a restart point is always the first to fail.
Step 4: Tool the Bead
Immediately after applying caulk — before it starts to skin over — tool the bead to press it into the joint and create a smooth, slightly concave surface.
Wet finger method: Dip your finger in the cup of soapy water. Run it firmly along the bead in one smooth stroke, pressing the caulk into the joint. The soapy water prevents the silicone from sticking to your finger. Use one long stroke per section, not multiple passes.
Smoothing tool: The caulk smoothing tool kit includes contoured plastic tools that produce a consistent profile. Wet the tool before each pass. The concave profile in the tool creates a slight concave finish in the caulk, which is both aesthetic and functional — it sheds water rather than collecting it.
Remove the tape immediately after tooling, while the silicone is still wet. Pull the tape away at a 45-degree angle, toward the caulk line, not away from it. This produces a clean edge. If you let the silicone cure with tape on, removing it will tear the edge.
Step 5: Cure Time Before Use
100% silicone caulk needs time before water exposure:
- Minimum: 24 hours before any water contact
- Recommended: 48 hours for a full, reliable seal
- Cool or poorly ventilated bathrooms: 72 hours is safer
Open the bathroom window or run the exhaust fan to speed curing. Silicone cures by reacting with atmospheric moisture — it does not “dry” in the traditional sense. Warmer, slightly humid air (not soaking wet) actually speeds the process compared to cold, stagnant air.
Do not touch or press the caulk line during cure time. Even a light touch in the first 12 hours can leave a dent or break the surface skin.
Preventing Mold in Shower Caulk
Silicone itself does not support mold growth — the mold that appears on caulk lines is growing on soap scum, mineral deposits, and body oil that accumulate on the surface. Prevention is straightforward:
- Dry the caulk line after each shower. A quick wipe with a towel takes 10 seconds and removes the surface layer that mold colonizes.
- Run the exhaust fan. Keep it running for 20 minutes after every shower. High ambient humidity accelerates surface deposit accumulation. If your fan is undersized or broken, see How to Install a Bathroom Exhaust Fan.
- Squeegee the walls. Removing standing water from tile surfaces reduces mineral deposits that give mold a foothold.
- Clean monthly. A spray-down with a bathroom mold and mildew cleaner once a month removes early-stage buildup before it sets.
- Choose mildewcide caulk. Products labeled with built-in mildewcide (GE Sealants Silicone II, DAP Kwik Seal Ultra) have antimicrobial additives in the caulk itself that slow surface mold.
Related Reading
- Remove All Old Caulk
This step takes the most time and is the one people rush. Do not rush it.
- Dry Completely
This is the step that most failed re-caulk jobs have in common: the joint was not dry.
- Tape and Apply
Tape the lines. Run painter's tape along both sides of the joint — one strip on the tile, one on the shower pan. Leave the gap of the joint exposed. Tape creates clean edges and prevents silicone from smearing across the tile face.
- Tool the Bead
Immediately after applying caulk — before it starts to skin over — tool the bead to press it into the joint and create a smooth, slightly concave surface.
- Cure Time Before Use
100% silicone caulk needs time before water exposure:
Free: 10-Point Home Maintenance Checklist
Prevent costly repairs with this seasonal checklist. Save hundreds every year by catching problems early.
Your checklist is ready!
Open Checklist →Something went wrong. View the checklist here.