How to Fix a Bathroom Tile That Fell Off (Reattach Without Replacing the Whole Row)
Bathroom tile fell off? Scrape off old mastic, apply mosaics adhesive or thinset ($5–$10), press tile back, let cure 24 hours, then regrout. Costs $5–$25 in materials. Takes 30 minutes of work — most is wait time.
Reattaching a bathroom wall tile that fell off: (1) Check the wall behind where the tile was — if the backer board is wet, crumbling, or moldy, fix the water source first or the tile will fall again. (2) Scrape old adhesive off both the tile back and the wall with a putty knife until flat. (3) Apply mastic tile adhesive or thinset mortar to the wall with a notched trowel. (4) Press the tile firmly into place with a slight twisting motion. Use painter's tape to hold it in position while the adhesive cures (24 hours). (5) After curing, fill the grout lines with color-matched sanded or unsanded grout. (6) Seal the grout after 72 hours. For a shower/tub surround tile: use only mold-resistant silicone in the corner joints, not grout.
Frequently Asked Questions
Why did my bathroom tile fall off the wall?
The most common causes are water infiltrating behind the tile through cracked or missing grout, causing the tile adhesive to fail over time; original installation with insufficient adhesive coverage (less than 80 percent back coverage is a common DIY mistake); steam and humidity cycling that causes the wall substrate to expand and contract; and substrate rot or mold from prolonged moisture exposure behind the tile.
Can I reuse the tile that fell off?
Yes, in most cases. Clean all the old adhesive off the back of the tile using a putty knife and a tile adhesive remover. The tile is reusable as long as it is not cracked and the glaze is intact. If the tile is cracked or chipped, take it to a tile store to find the closest match.
What adhesive should I use to reattach a bathroom tile?
For a shower or tub surround, use white mastic tile adhesive or thinset mortar rated for wet areas. White versions are preferred in bathrooms because any gaps in grout coverage will not show dark adhesive through light-colored grout. Avoid premixed construction adhesive (like Liquid Nails) in wet areas — it is not waterproof and will fail again.
How long do I need to wait before grouting after reattaching a tile?
Wait at least 24 hours for mastic adhesive and at least 48 to 72 hours for thinset mortar. The adhesive must be fully cured before grouting, otherwise the grouting pressure can shift the tile out of position and the adhesive will not bond properly under the stress of grouting tool pressure.
Do I need to seal the grout after the repair?
Yes. In a shower or tub surround, all grout joints should be sealed after the grout has cured — typically 48 to 72 hours after grouting. Grout sealer fills the microscopic pores in grout, dramatically slowing water absorption. Without sealer, water wicks into the grout, which accelerates adhesive failure and mold growth behind the tile.
What if the wall behind the fallen tile is damaged or moldy?
If you see soft drywall, crumbling cement board, or black or green mold on the substrate behind the tile, address the substrate before reattaching the tile. Cut out and replace any damaged section of cement board or greenboard, allow it to dry completely, then apply a waterproofing membrane before setting the new tile. Skipping this step means the same problem will return.
How do I keep bathroom tiles from falling off again after repair?
Tiles re-fall from the same three causes: water infiltration through failed grout or caulk, inadequate adhesive coverage, and substrate movement. Prevention: (1) Re-seal all grout with a penetrating silicone sealer annually — it dramatically slows water absorption into the joints. (2) Replace caulk in all corners and transitions (floor-to-wall, wall-to-tub) at the first sign of cracking or pulling away — grout in corners always fails eventually; caulk does not. (3) When re-setting, back-butter the tile (apply thinset to the wall and to the tile back) to achieve 90%+ contact coverage — this is the most common installation error in failed tile repairs.
What should I do if I can't find a matching replacement tile?
Three options when an exact tile match is unavailable: (1) Donor tile — pull a tile from a hidden area (inside a cabinet, behind the toilet, in a closet with the same tile) and use it for the visible repair; install a close match in the hidden donor location. This gives a perfect match where it matters. (2) Accent tile — use the fallen tile position to introduce a deliberate accent tile in a contrasting color, size, or mosaic pattern. This reads as intentional design rather than a mismatch. (3) Section replacement — if the fallen tile is in a high-visibility area and no donor tile is available, remove the entire horizontal row or a defined section and replace with complementary new tile bordered by a contrasting trim strip. Option 1 is the cleanest solution when a donor location exists.
Reattaching a bathroom wall tile that fell off: (1) Check the wall behind where the tile was — if the backer board is wet, crumbling, or moldy, fix the water source first or the tile will fall again. (2) Scrape old adhesive off both the tile back and the wall with a putty knife until flat.
A bathroom tile that drops off the wall — whether in the shower, above the tub, or on the backsplash — is one of the most common DIY repairs homeowners face. It looks worse than it is. If the tile itself is intact and the substrate behind it is dry and solid, you can have it back on the wall and fully grouted within two days. The key is understanding why it fell in the first place and addressing that root cause so the repair lasts.
What You Need
- White mastic tile adhesive or thinset mortar (wet area rated) — white color prevents show-through under light grout
- Notched trowel (3/16-inch V-notch for wall tiles) — creates ridges for full adhesive contact
- Premixed sanded or unsanded grout — match your existing grout color; sanded for joints over 1/8 inch
- Grout float — for pressing grout into joints cleanly
- Grout sealer — essential in any wet area after grout cures
- Painter’s tape — for holding the tile in place while adhesive sets
- Grout saw or oscillating tool with grout blade — for removing old grout around the repair area
- Putty knife and adhesive remover — for cleaning old adhesive from the tile back and wall
- Sponge and bucket — for wiping grout haze during finishing
Step 1: Assess the Substrate
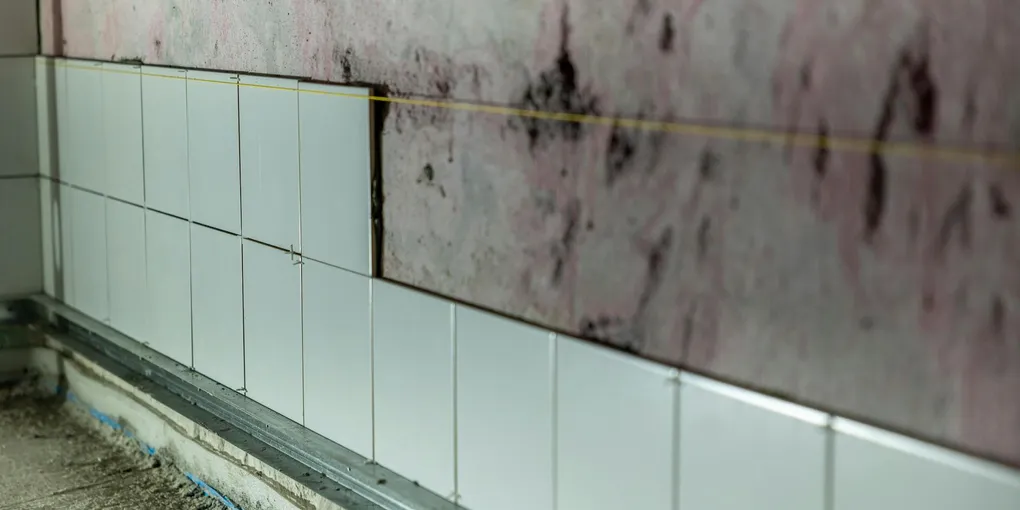
Before touching the tile, inspect the exposed wall behind it. This is the most important step of the repair and the one most DIYers skip.
Press your finger against the wall substrate. It should feel firm and dry. Run a screwdriver handle along the surrounding tiles and listen for a hollow sound — a dull thud instead of a solid tap indicates tiles that have lost adhesion and will fall soon. Any adjacent hollow-sounding tiles should be removed and reset at the same time.
Dry substrate (no damage): Proceed with the repair as described below.
Soft or crumbling substrate: The wall behind the tile has been exposed to water for long enough to degrade. For drywall or greenboard (water-resistant drywall), cut out the damaged section and replace with cement board or a proper tile backer board. For cement board that is soft, a moisture or alkaline issue in the wall cavity needs addressing before proceeding.
Mold visible on substrate: Clean small spots (less than 10 square inches) with a diluted bleach solution (1 cup bleach per gallon of water) and let dry for 24 hours. Larger mold areas should be evaluated by a professional before you enclose them again.
Allow any cleaned or replaced substrate to dry fully — at least 24 hours at room temperature — before applying adhesive.
Step 2: Clean the Tile Back and the Wall
Clean adhesive residue off both the back of the fallen tile and the exposed wall surface. Fresh adhesive will not bond well over old, dried adhesive.
Tile back: Use a putty knife to scrape off as much old adhesive as possible. For stubborn adhesive, apply tile adhesive remover per product instructions and let it soften the material before scraping. The goal is a clean, bare tile back. Rinse and let the tile dry completely.
Wall surface: Scrape the wall surface smooth with the putty knife. Any raised adhesive ridges will create a high spot that prevents the tile from sitting flush with the surrounding tiles.
If the surrounding grout around the empty space is cracked or crumbling, use a grout saw or an oscillating tool with a grout removal blade to remove the old grout from all four sides of the opening. Removing the grout now lets you apply fresh grout that bonds properly after the tile is set. Brush out grout dust from the joints with a stiff brush.
Step 3: Apply the Adhesive
Use white mastic tile adhesive for tiles up to 4x4 inches on a dry or occasionally wet surface. Use thinset mortar for larger tiles, for shower walls that are wet daily, or if the substrate is cement board. Both are available premixed in small tubs for patch repairs.
Applying adhesive to the tile back (back-buttering):
- Scoop a golf-ball-sized amount of adhesive onto the center of the tile back.
- Spread it with the notched trowel, using the V-notch side to comb parallel ridges across the tile back. Hold the trowel at about a 45-degree angle.
- The ridges ensure full contact coverage when the tile is pressed onto the wall — at least 80 percent coverage is the standard for wet areas.
Applying adhesive to the wall (optional but recommended for large tiles):
For tiles larger than 4x4 inches, also apply a thin layer of adhesive to the wall surface using the flat side of the trowel, then comb ridges in the opposite direction to the ridges on the tile back. This cross-ridging maximizes coverage when the tile is pressed in place.
Do not apply adhesive to an area larger than you can tile in about 15 minutes — mastic and thinset begin to skin over and lose tack quickly in warm or dry conditions.
Step 4: Set the Tile
Press the tile firmly into position with a slight twisting motion to collapse the adhesive ridges and maximize contact. Do not slide it into position — sliding pushes adhesive into the grout joints and reduces bonding on the tile back.
Check that the tile is flush with the surrounding tiles on all sides. Press on all four corners and the center and look for any rocking. A rocking tile has a high spot on the wall or tile back — remove it, find the high spot, and correct it before resetting.
Use plastic tile spacers in the grout joints to maintain consistent joint width while the adhesive cures. Match the existing grout joint width in the surrounding tiles.
Secure the tile while curing:
Wall tiles on vertical surfaces can slide or sag before the adhesive sets. Cut strips of painter’s tape and apply them across the tile, connecting it to the surrounding tiles, to hold it in position. For a tile above the tub or in the shower, use blue painter’s tape — it leaves no residue and pulls off cleanly after curing.
Let the adhesive cure completely. Mastic: 24 hours minimum. Thinset: 48 to 72 hours minimum. Do not run water in the shower or tub during this period.
Step 5: Apply Grout
Once the adhesive is fully cured, remove the tile spacers and tape. Mix your grout per package directions, or use premixed grout from a tub for small repairs.
Match the existing grout: Bring a photo of the existing grout color to the hardware store, or bring a small sample scraped from an inconspicuous joint. Grout color changes slightly as it dries — buy a small test amount if you are uncertain.
- Dampen the tile surface and the joints lightly with a moist sponge to prevent the grout from drying too quickly.
- Load a small amount of grout onto the rubber grout float.
- Press the grout into the joints around the repaired tile using diagonal strokes of the float. Work at a 45-degree angle to the joint direction to force grout deep into the gaps.
- After filling all joints, hold the float nearly flat and make a sweeping pass diagonally across the tile to remove excess grout from the tile face.
- Let the grout set for 15 to 20 minutes — it will start to haze on the tile surface.
Wipe the haze:
Dampen a grout sponge with clean water and wring it until barely damp. Wipe the tile in broad circular motions to remove the grout haze. Rinse the sponge frequently. Do not let the water become milky with grout — that puts grout residue back on the tiles. A second, drier wipe-down with a microfiber cloth removes any remaining film once the grout is nearly dry.
Step 6: Seal the Grout
Allow the grout to cure for at least 48 to 72 hours before applying grout sealer. Applying sealer too early traps moisture in the grout and prevents proper curing.
Apply grout sealer using a small applicator bottle or a sealer pen for precision in the joints. Work in short sections, let the sealer penetrate for the time specified on the label (typically 5 to 10 minutes), then buff away any excess sealer from the tile face with a clean cloth.
Apply two coats of sealer for maximum protection in a shower or tub surround. The repaired area is now complete and fully waterproofed.
Caulk the perimeter joints: If the repair is at the tile-to-tub or tile-to-floor junction, these corners should be filled with silicone caulk rather than grout. Grout cracks at movement joints; silicone flexes. Remove any grout from these corners and fill with a color-matched silicone caulk rated for wet areas.
Preventing the Problem in the Future
The most effective long-term protection is maintaining the grout. Inspect all grout in the shower and tub area once a year. Hairline cracks and crumbling grout should be raked out and regrouted before water reaches the adhesive layer. Reapply grout sealer every one to two years in shower areas.
Running the exhaust fan during and for 15 minutes after every shower dramatically reduces moisture levels and extends the life of tile adhesive and grout.
Related Reading
- How to Regrout a Shower
- How to Fix Bathroom Floor Grout — re-grout cracked or crumbling grout lines before tiles start falling off
- How to Fix a Bathtub Caulk
- How to Fix a Small Bathroom on a Budget
- How to Fix a Floor Tile That Is Loose — epoxy injection for hollow tiles that haven’t yet fallen off
- How to Unclog a Drain
- Assess the Substrate
Before touching the tile, inspect the exposed wall behind it. This is the most important step of the repair and the one most DIYers skip.
- Clean the Tile Back and the Wall
Clean adhesive residue off both the back of the fallen tile and the exposed wall surface. Fresh adhesive will not bond well over old, dried adhesive.
- Apply the Adhesive
Use white mastic tile adhesive for tiles up to 4x4 inches on a dry or occasionally wet surface. Use thinset mortar for larger tiles, for shower walls that are wet daily, or if the substrate is cement board.
- Set the Tile
Press the tile firmly into position with a slight twisting motion to collapse the adhesive ridges and maximize contact. Do not slide it into position — sliding pushes adhesive into the grout joints and reduces bonding on the tile back.
- Apply Grout
Once the adhesive is fully cured, remove the tile spacers and tape. Mix your grout per package directions, or use premixed grout from a tub for small repairs.
- Seal the Grout
Allow the grout to cure for at least 48 to 72 hours before applying grout sealer. Applying sealer too early traps moisture in the grout and prevents proper curing.
Free: 10-Point Home Maintenance Checklist
Prevent costly repairs with this seasonal checklist. Save hundreds every year by catching problems early.
Your checklist is ready!
Open Checklist →Something went wrong. View the checklist here.