How to Paint Kitchen Cabinets Like a Pro (Without Sanding to Bare Wood)
Transform your kitchen for $200 instead of $15,000. Here is the step-by-step process professionals use to paint kitchen cabinets that last.
Paint kitchen cabinets by removing all doors and hardware, cleaning with TSP degreaser, lightly sanding with 220-grit, priming with shellac-based primer, and applying two thin coats of cabinet-specific enamel paint. Let everything cure 3-5 days before reassembly. The entire project costs $150-300 in materials and takes a long weekend.
Frequently Asked Questions
Can I paint kitchen cabinets without sanding?
You still need a light scuff with 220-grit sandpaper to give the primer something to grip. You do not need to sand down to bare wood. Just dull the existing sheen so it feels slightly rough.
What kind of paint should I use on kitchen cabinets?
Use a cabinet-specific alkyd or hybrid enamel like Benjamin Moore Advance or Sherwin-Williams ProClassic. Never use regular wall paint on cabinets, as it stays soft and will chip, peel, and stick where doors meet the frame.
How long do painted kitchen cabinets take to fully cure?
Paint feels dry in hours but does not reach full hardness for 2-4 weeks. Wait at least 3-5 days before reattaching doors, handle everything gently for 2 weeks, and avoid slamming doors for the first month.
Do I need to prime kitchen cabinets before painting?
Yes. Primer is the most important step. Use a shellac-based primer like Zinsser BIN for the best adhesion. Skipping primer will cause the paint to look fine initially but start peeling at edges within a month.
Can I paint laminate or thermofoil cabinets?
It is not recommended. Paint does not adhere well to thermofoil or laminate surfaces even with specialized primers, and results are inconsistent. Painting works best on solid wood, plywood, or MDF cabinets.
Paint kitchen cabinets by removing all doors and hardware, cleaning with TSP degreaser, lightly sanding with 220-grit, priming with shellac-based primer, and applying two thin coats of cabinet-specific enamel paint. Let everything cure 3-5 days before reassembly.
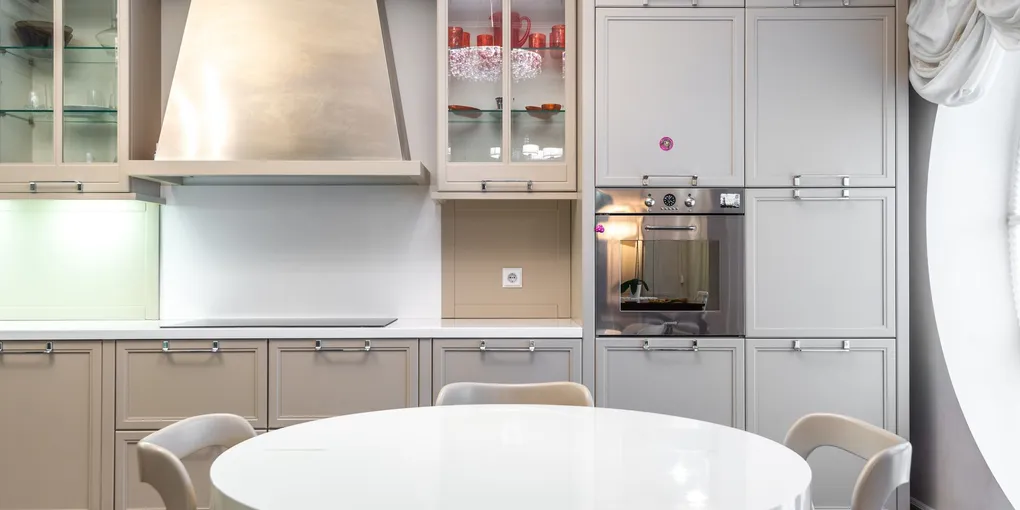
New kitchen cabinets cost $8,000-25,000 installed. Painting your existing cabinets costs $150-300 in materials and a long weekend of work. If your cabinets are structurally sound but look dated, painting them is the single highest-ROI home improvement project you can do.
The difference between a paint job that looks professional and one that looks like a DIY disaster comes down to preparation. The actual painting is the easy part. Prep is 80% of the work and 100% of what determines whether the finish holds up or peels within a year.
Should You Paint Your Cabinets?
Painting works great if your cabinets are solid wood, plywood, or MDF in good structural condition. It does not work well on:
- Thermofoil or laminate cabinets — Paint does not adhere well to these surfaces without specialized primers, and even then results are inconsistent.
- Cabinets with water damage, warping, or delamination — Fix the structural issue first, or it will show through the paint.
- Cabinets you hate the layout of — Paint changes the color, not the configuration.
Materials You Need
Supplies (total cost $150-300):
- Primer: Shellac-based primer like Zinsser BIN or Kilz Original (oil-based). Do not use latex primer on cabinets. ($15-25 per quart)
- Paint: Benjamin Moore Advance, Sherwin-Williams ProClassic, or any cabinet-specific alkyd/hybrid enamel. Do not use wall paint. ($40-60 per gallon, you need 1-2 gallons for an average kitchen) If you are also painting the bathroom, see our guide to the best paint for bathroom walls.
- 220-grit sandpaper and sanding sponges ($10)
- TSP (trisodium phosphate) cleaner or Krud Kutter ($8)
- Painter’s tape ($10)
- 4-inch foam rollers and a high-quality 2-inch angled brush ($20)
- Drop cloths ($10)
- Ziplock bags and marker for labeling hardware
Tools:
- Drill or screwdriver for removing doors and hardware
- Sawhorses or a flat surface for painting doors
- Optional but recommended: paint sprayer rental ($40-75/day) for a glass-smooth finish
Step 1: Remove Everything
Take off all cabinet doors, drawers, and hardware. This is non-negotiable. Painting cabinets in place produces drips, missed spots, and paint buildup on hinges.
- Number each door and its corresponding opening with painter’s tape and a marker. Cabinets look interchangeable but often are not.
- Remove hinges from the doors and the cabinet frames.
- Remove all knobs, pulls, and catches.
- Put each door’s hardware in a labeled ziplock bag.
- Remove drawers and unscrew the drawer fronts if possible (most have screws accessible from inside).
Step 2: Clean Thoroughly
Kitchen cabinets have years of grease buildup, especially near the stove and above the dishwasher. Paint will not stick to grease.
- Mix TSP according to the package directions (or use Krud Kutter straight).
- Wash every surface you plan to paint — door fronts, door backs, cabinet frames, drawer fronts.
- Pay extra attention to the area around handles (skin oils accumulate there) and the cabinets nearest the stove.
- Rinse with clean water and let everything dry completely.
Step 3: Sand (Light Scuff Only)
You do not need to sand to bare wood. You just need to scuff the existing finish so the primer has something to grip.
- Use 220-grit sandpaper or a sanding sponge.
- Sand every surface you plan to paint with light, even pressure. You are not removing the old finish, just dulling the sheen.
- The surface should feel slightly rough and look matte when you are done.
- Wipe down everything with a tack cloth or damp microfiber to remove all sanding dust.
Step 4: Prime
Primer is what makes cabinet paint stick and last. This is the most important step. Do not skip it, and do not use the wrong primer.
Use shellac-based primer (Zinsser BIN) for the best adhesion on previously finished cabinets. It sticks to anything, dries in 45 minutes, and blocks tannin bleed from wood. It smells strong, so ventilate well.
- Stir the primer (never shake shellac primer — it creates bubbles).
- For doors: lay them flat on sawhorses. Apply a thin coat with a foam roller, then tip off with a brush in the direction of the grain. Thin and even beats thick.
- For cabinet frames: use a brush for the details, then roll the flat areas.
- Let the primer dry completely (45 minutes to 1 hour for shellac-based).
- Lightly sand the primed surfaces with 220-grit. This knocks down any texture and gives the paint a smooth base.
- Wipe with a tack cloth.
One coat of primer is usually sufficient with shellac-based products. If you see dark wood or stains bleeding through, apply a second coat.
Step 5: Paint (Two Thin Coats)
Thin coats are the key to a professional finish. Thick coats sag, drip, and take forever to cure.
- Stir the paint gently (do not shake).
- Load the foam roller lightly — it should be evenly coated but not dripping.
- Roll in one direction, then lightly tip off (one final, light pass with the roller or brush in the same direction) to smooth the finish.
- For raised panel doors: brush the recessed panel and edges first, then roll the flat frame sections.
- Let the first coat dry completely. For alkyd/hybrid enamels, this is usually 4-6 hours (check the can).
- Lightly sand between coats with 220-grit if there are any bumps or texture. Wipe with tack cloth.
- Apply the second coat the same way.
Tip: Paint the backs of the doors first. Once dry, flip them over and paint the fronts. This way, if the backs pick up any marks from the sawhorses, nobody sees them.
Step 6: Let Everything Cure
This is where most people make a mistake. Paint may feel dry in hours, but it does not reach full hardness for 2-4 weeks.
- Wait at least 3-5 days before reattaching doors and drawers.
- Handle everything gently for the first 2 weeks.
- Do not put shelf liner or contact paper on painted surfaces for at least 4 weeks.
- Avoid slamming cabinet doors for the first month. Soft-close hinges ($2-3 each) are a worthwhile upgrade at this stage.
Step 7: Reassemble
- Install new hardware if you are upgrading (highly recommended — new pulls transform the look). If reusing old hardware, clean it with Bar Keeper’s Friend or spray-paint it for a fresh look.
- Reattach hinges to the cabinet frames first, then hang the doors using your numbering system.
- Reinstall drawers and adjust as needed.
- Step back and admire a $15,000 look for $200.
Common Mistakes to Avoid
Using wall paint. Wall paint stays soft and will chip, peel, and stick to itself where doors meet the frame. Use cabinet-specific enamel.
Skipping primer. The paint will look fine for a month, then start peeling at edges and where you grip the doors. Primer is not optional.
Painting too thick. Two thin coats beat one thick coat every time. Thick coats sag, wrinkle, and take days to dry.
Not removing doors. Painting doors in place guarantees drips along the bottom edge, paint bridging the hinge gap, and an obviously amateur result.
Rushing the cure time. Reassembling too soon means the doors stick to the frames, and every contact point gets marked. Patience here saves the entire project.
Estimated Cost and Savings
| DIY Paint | Hire a Painter | New Cabinets | |
|---|---|---|---|
| Materials | $150-300 | Included | N/A |
| Labor | Free (2-3 days) | $1,500-4,000 | $3,000-8,000 |
| Cabinets | Existing | Existing | $5,000-15,000 |
| Total | $150-300 | $1,500-4,000 | $8,000-25,000 |
Even compared to hiring a professional painter, doing it yourself saves $1,200-3,700. Compared to new cabinets, the savings are staggering. Want to know what a full room paint job runs? See how much it costs to paint a room. If you’re considering hiring a professional instead of DIYing, see our kitchen cabinet painting cost guide for what to expect. And if you are updating your bathroom at the same time, check out our small bathroom remodel ideas for more budget-friendly upgrades.
Related Reading
- How to Fix a Broken Drawer Pull — replace stripped or cracked drawer hardware while the cabinet doors are off
- Kitchen Remodel Cost Breakdown — full cost guide when painting isn’t enough and a remodel is on the table
- Remove doors, drawers, and hardware
Number each door and its opening with tape and a marker. Remove all hinges, knobs, pulls, and catches. Put each door's hardware in a labeled ziplock bag.
- Clean all surfaces with TSP
Wash every surface with TSP degreaser or Krud Kutter to remove years of grease buildup. Pay extra attention to areas near the stove and around handles. Rinse with clean water and let dry.
- Sand with 220-grit
Lightly scuff all surfaces with 220-grit sandpaper to dull the existing sheen. You do not need to sand to bare wood. Wipe down with a tack cloth to remove all dust.
- Apply shellac-based primer
Apply a thin coat of shellac-based primer like Zinsser BIN with a foam roller and brush. Let dry 45 minutes to 1 hour, then lightly sand with 220-grit and wipe with a tack cloth.
- Apply two thin coats of cabinet paint
Use a cabinet-specific alkyd or hybrid enamel paint. Roll in one direction and tip off for a smooth finish. Let the first coat dry 4-6 hours, sand lightly between coats, then apply the second coat.
- Let everything cure
Wait at least 3-5 days before reattaching doors. Handle gently for 2 weeks. Do not slam doors for the first month. Full hardness takes 2-4 weeks.
- Reassemble cabinets
Install new or cleaned hardware, reattach hinges to frames, hang doors using your numbering system, and reinstall drawers. Adjust alignment as needed.
Free: 10-Point Home Maintenance Checklist
Prevent costly repairs with this seasonal checklist. Save hundreds every year by catching problems early.
Your checklist is ready!
Open Checklist →Something went wrong. View the checklist here.