How to Change a Furnace Filter (5-Minute Job, $15-30 Filter)
Changing your furnace filter takes 5 minutes and cuts heating/cooling bills by 5-15%. Here is exactly how to find the size, swap it, and avoid the MERV rating mistake that starves your blower.
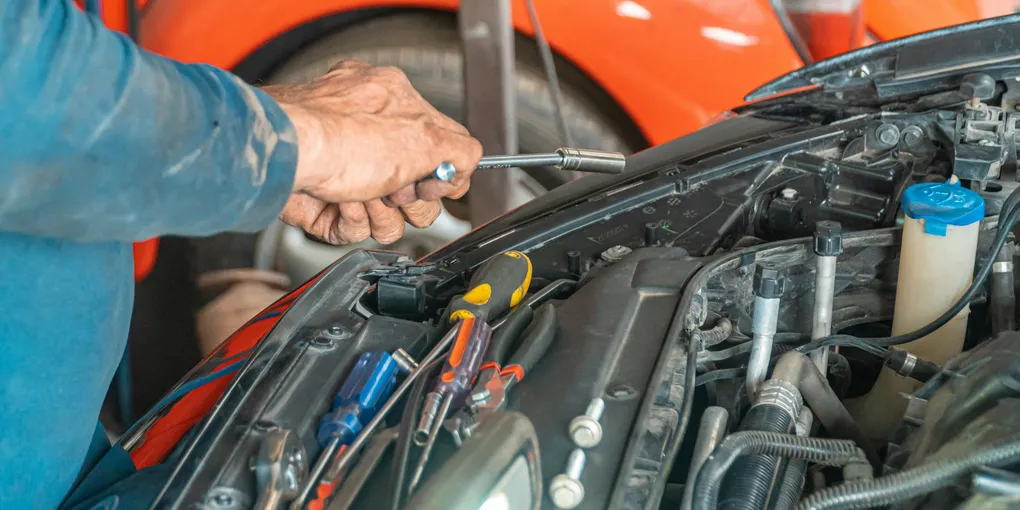
Turn off the furnace at the thermostat, locate the filter slot (in the return duct or the blower compartment), slide out the old filter, check the size printed on the frame (e.g., 16x25x1), and slide a new one in with the airflow arrow pointing toward the furnace. Replace every 1-3 months for 1-inch filters and every 6-12 months for 4-inch filters. Most homeowners can do this in 5 minutes with zero tools. Use MERV 8-11 for typical homes — MERV 13+ restricts airflow and can damage the blower.
Frequently Asked Questions
How often should I change my furnace filter?
For standard 1-inch filters, change every 1-3 months. Change monthly during heavy use (peak heating or cooling season, homes with pets, or household members with allergies). Thicker 4-inch and 5-inch media filters last 6-12 months. Check the filter monthly — if light won't pass through it, replace it regardless of the calendar.
What size furnace filter do I need?
The size is printed on the frame of your current filter (e.g., 16x25x1 or 20x25x4). The three numbers are length x width x thickness in inches. If you cannot read the old filter, measure the slot opening — round the length and width to the nearest inch. Never force a filter that does not fit — a filter with gaps around the edges filters nothing.
What MERV rating should I use?
MERV 8-11 for most homes — good filtration without restricting airflow. MERV 13+ is only appropriate if your HVAC system was designed for it, or you have allergy/immunocompromised household members and a newer high-static blower. Using MERV 13 in a system designed for MERV 8 starves the blower, overheats the motor, and ices the AC coil.
Which way does the filter go in?
The airflow arrow printed on the filter frame points toward the furnace (in the direction air is moving). If your filter is in the return duct before the blower, the arrow points toward the blower. Install the filter backward and it will deform, leak air around the edges, and shed fibers into the blower.
Can I wash and reuse a furnace filter?
Only if it is explicitly marked as washable (electrostatic or reusable foam). Standard fiberglass and pleated filters are disposable — washing them degrades the filter media and does not restore airflow. Washable filters save money long-term but filter less than a new MERV 11 pleated filter.
What happens if you don't change your furnace filter?
A clogged furnace filter causes four problems: (1) Higher energy bills — your blower works harder to pull air through the restriction, increasing electricity consumption by 10–25%. (2) Blower motor damage — the motor overheats from reduced airflow. Blower motor replacement costs $300–$700. (3) Frozen AC coil — in summer, restricted airflow causes the evaporator coil to ice over, stopping cooling entirely and potentially damaging the compressor ($1,000–$3,000 repair). (4) Dirtier air — once the filter media is saturated, it bypasses around the edges, sending unfiltered dust into the supply ductwork. Most HVAC service calls caused by system failure trace back to a filter that wasn't changed. A $15 filter changed every 2 months prevents most of them.
Where is my furnace filter located?
Furnace filters are in one of three locations: (1) Return air vent (most common) — a large floor, wall, or ceiling register (typically 12×24 inches or larger) that pulls air in. The filter sits behind the grille. (2) Blower compartment — a slot on the air handler or furnace unit itself, usually near the bottom where air enters the blower. (3) Air handler cabinet — some systems have a dedicated filter rack inside the air handler. To find it: stand near your furnace, turn on the fan, and follow the airflow. The filter is always on the 'return' (intake) side — where air enters the furnace — never on the supply side where conditioned air exits. If you have multiple return vents in your home, look for the one with a filter behind the grille.
Turn off the furnace at the thermostat, locate the filter slot (in the return duct or the blower compartment), slide out the old filter, check the size printed on the frame (e.g., 16x25x1), and slide a new one in with the airflow arrow pointing toward the furnace. Replace every 1-3 months for 1-inch filters and every 6-12 months for 4-inch filters.
Your furnace filter is the cheapest, highest-ROI piece of HVAC maintenance you can do. A dirty filter makes your system work harder, raises your electric bill, shortens the life of your blower motor, and lets dust build up inside the ductwork where you will never clean it.
Changing it takes 5 minutes. Here is exactly how.
When to Change It
Hold the filter up to a bright light. If light passes through evenly, it is still working. If it looks gray or you cannot see light through the pleats, replace it.
General schedule:
- 1-inch filters — every 1-3 months (every month during peak heating or cooling)
- 2-inch filters — every 3 months
- 4-inch filters — every 6-12 months
- 5-inch media filters — every 6-12 months
Change more often if you have:
- Pets that shed (every 30 days minimum)
- Allergy or asthma sufferers in the household
- Ongoing construction or renovation nearby
- Smokers in the home
- A wood-burning stove or fireplace
What You’ll Need
Tools: None. Seriously.
Materials:
- A replacement filter in the correct size and MERV rating
That’s it. Most filter changes take 5 minutes and require no tools.
If you have not changed the filter in over a year, grab a vacuum to clean the filter housing before installing the new one.
Step 1: Turn Off the Furnace
Set your thermostat to Off — or at least to a temperature that won’t call for heat or cool during the swap. You don’t want the blower kicking on while the slot is open and sucking dust into the system.
Some installers also recommend flipping the furnace switch on the unit itself (looks like a light switch on the side of the furnace) for extra safety. Not strictly necessary for a filter swap, but doesn’t hurt.
Step 2: Find the Filter Slot
Furnace filters live in one of two places:
Location A: The return air duct — A large metal grille on a wall, ceiling, or floor. The filter sits behind the grille. Twist or unclip the grille to open it.
Location B: The blower compartment — A slot on the side of the furnace itself, often with a small access door or just a slot covered by a piece of metal or tape. Slide the old filter straight out.
Newer high-efficiency systems may have a dedicated media filter cabinet that holds thicker 4-5 inch filters.
If you have more than one return grille in the house, each one probably has its own filter. Check all of them.
Step 3: Check the Size Before You Buy
The size is printed on the frame of your current filter:
16 x 25 x 1That means 16 inches long, 25 inches wide, 1 inch thick.
If you cannot read the old filter:
- Measure the slot opening.
- Round each dimension to the nearest inch.
- Measure the slot depth for the thickness.
Common sizes:
- 16x20x1
- 16x25x1
- 20x20x1
- 20x25x1
- 16x25x4
- 20x25x4
- 20x25x5
Filter sizes are “nominal” — the actual filter is about 1/4 to 1/2 inch smaller on each side so it slides in easily. You do not need to account for this when buying.
Step 4: Pick the Right MERV Rating
MERV (Minimum Efficiency Reporting Value) measures how well the filter captures particles. Higher numbers catch smaller particles — but also restrict airflow.
| MERV | What It Catches | When to Use |
|---|---|---|
| 1-4 | Large dust, lint, pollen | Budget builds; minimum acceptable for equipment protection |
| 5-8 | Mold spores, pet dander | Standard homes, standard systems |
| 9-12 | Finer dust, auto emissions | Homes with allergies; good balance |
| 13-16 | Bacteria, smoke, smog | Allergies + compatible system only |
| 17+ (HEPA) | Viruses, smoke particles | Medical settings; rare in residential |
The MERV 13+ mistake:
Many homeowners see “better filtration” and buy MERV 13 filters. If your HVAC system was not designed for it, the restricted airflow:
- Overworks the blower motor (early failure)
- Causes the AC evaporator coil to freeze in summer
- Causes the heat exchanger to overheat in winter
- Actually reduces air quality because less air moves through the filter per hour
Rule of thumb: If your system is older than 10 years or the manual does not explicitly support MERV 13, stick with MERV 8-11. MERV 11 pleated filters are the sweet spot for most homes.
Step 5: Slide the Old Filter Out
Put on a dust mask if the filter is particularly dirty — old filters shed dust as they move.
Pull the filter straight out of the slot. Keep it flat if possible — tilting a loaded filter dumps dust back into the duct.
Walk it directly to a trash bag. Do not set it on the floor or carpet.
Step 6: Vacuum the Slot (If Needed)
If it has been a long time since the last change, use a vacuum hose to clean dust from:
- The filter slot itself
- The visible portion of the return duct
- Any cold air leak spots around the filter housing
Don’t go deep into the duct — just clean what you can see with a flashlight.
Step 7: Check the Airflow Arrow
Every furnace filter has a printed arrow on the cardboard frame labeled AIRFLOW or AIR FLOW →.
The arrow points in the direction air is moving.
That means:
- Filter in a return duct (before the blower): arrow points toward the furnace
- Filter in the blower compartment: arrow points toward the blower/furnace
- Filter in a ceiling return grille: arrow points up, toward the ceiling
If you install a pleated filter backward:
- The pleats deform under airflow and collapse
- Air leaks around the frame instead of through the media
- The filter holds much less dust before clogging
- Fibers can shed into the blower
Step 8: Slide the New Filter In
Orient the airflow arrow correctly, then slide the filter straight into the slot. It should go in smoothly with the frame flush against the slot opening.
Good fit signs:
- Filter slides all the way in with no gaps at the opening
- No visible air gaps around any edge
- Access cover closes flush
Bad fit signs (don’t ignore):
- Filter is visibly smaller than the slot — air bypasses the filter entirely
- Filter is too big and bowing — it will leak around the edges
- Access cover won’t close — dust will enter the blower
If the fit is bad, take the filter back and exchange it for the correct size. A wrong-sized filter is worse than no filter because it gives you false confidence while doing no actual filtering.
Step 9: Close the Access Cover and Restart
Close the grille or access door. Make sure it seals — use weather stripping if the cover is flimsy and leaks air.
Turn the thermostat back on. Listen to the blower — airflow should feel stronger at the registers than with the old filter.
Step 10: Write the Date on the New Filter
Grab a marker and write the install date on the frame of the new filter:
Installed: Apr 18 2026
Replace by: Jul 18 2026
This is the single easiest way to stay on schedule. Every time you pass the furnace, the date is right there.
How Much You’ll Spend
| Filter Type | Price | Replacement Frequency | Annual Cost |
|---|---|---|---|
| Fiberglass 1” | $2-4 | Monthly | $24-48 |
| Pleated MERV 8 1” | $8-12 | Every 3 months | $32-48 |
| Pleated MERV 11 1” | $12-18 | Every 3 months | $48-72 |
| Pleated MERV 13 1” | $15-25 | Every 3 months | $60-100 |
| Media 4” MERV 11 | $30-50 | Every 6-12 months | $30-100 |
| Washable electrostatic | $50-90 one-time | Clean every 30 days | $0 after year 1 |
Buying filters in 6-packs on Amazon is typically 20-30% cheaper than single filters at a big-box store. Subscribe-and-save is another 5-15% off.
Smart Filter Subscriptions
Services like FilterEasy, Second Nature, and Amazon’s filter subscription ship filters to your door on your schedule. They cost about the same as buying in bulk and you never think about it.
Worth it if you forget to change filters. Skip it if you buy a 6-pack and leave them next to the furnace.
What Dirty Filters Actually Cost You
Cost of a neglected filter:
- 10-15% higher HVAC bills — restricted airflow makes the system run longer
- $300-600 blower motor replacement when the motor burns out 3-5 years early
- $1,500-3,000 AC compressor replacement if frozen coils damage the compressor
- $50-200 duct cleaning when dust bypasses a leaking filter and coats the ducts
Cost of changing it on schedule: $30-100 per year.
Signs You Need to Change It Right Now
- Air coming from registers feels weak
- AC runs constantly but can’t cool the house
- You can see dust on the filter surface (hold it to light)
- The filter is visibly gray or warped
- It has been more than 3 months since last change
- You can’t remember the last change
When to Upgrade the System, Not the Filter
Changing filters religiously won’t rescue a bad HVAC setup. Consider deeper fixes if:
- Filter clogs in under 30 days every time
- Registers in some rooms get no air even with a fresh filter
- Your system is 15+ years old and still uses 1-inch filters
- You have musty odors from the vents regardless of filter
A duct cleaning won’t fix those — you likely need HVAC service. But a fresh filter is always step 1.
Related Reading
- HVAC Maintenance Checklist — full annual HVAC calendar
- AC Tune-Up Cost — professional spring service pricing
- Best Smart Thermostats — pair a fresh filter with smart controls
- Spring Home Maintenance Checklist — the full seasonal task list
- Best Air Purifiers for Allergies and Pet Hair — when whole-house filtration is not enough
- How to Seal Leaky Ductwork — duct leaks waste 20–30% of heating and cooling — the highest-impact efficiency fix after filter replacement
- Duct Cleaning Cost — when to go beyond filters and have ducts professionally cleaned
- Turn Off the Furnace
Set your thermostat to Off — or at least to a temperature that won't call for heat or cool during the swap. You don't want the blower kicking on while the slot is open and sucking dust into the system.
- Find the Filter Slot
Furnace filters live in one of two places:
- Check the Size Before You Buy
The size is printed on the frame of your current filter:
- Pick the Right MERV Rating
MERV (Minimum Efficiency Reporting Value) measures how well the filter captures particles. Higher numbers catch smaller particles — but also restrict airflow.
- Slide the Old Filter Out
Put on a dust mask if the filter is particularly dirty — old filters shed dust as they move.
- Vacuum the Slot (If Needed)
If it has been a long time since the last change, use a vacuum hose to clean dust from:
Free: 10-Point Home Maintenance Checklist
Prevent costly repairs with this seasonal checklist. Save hundreds every year by catching problems early.
Your checklist is ready!
Open Checklist →Something went wrong. View the checklist here.