How to Fix a Loose Kitchen Faucet Handle in 5 Minutes
A loose kitchen faucet handle usually has one cause: a loose set screw under the decorative cap. Tighten it with a 3/32" hex key in 5 minutes — no plumber needed.
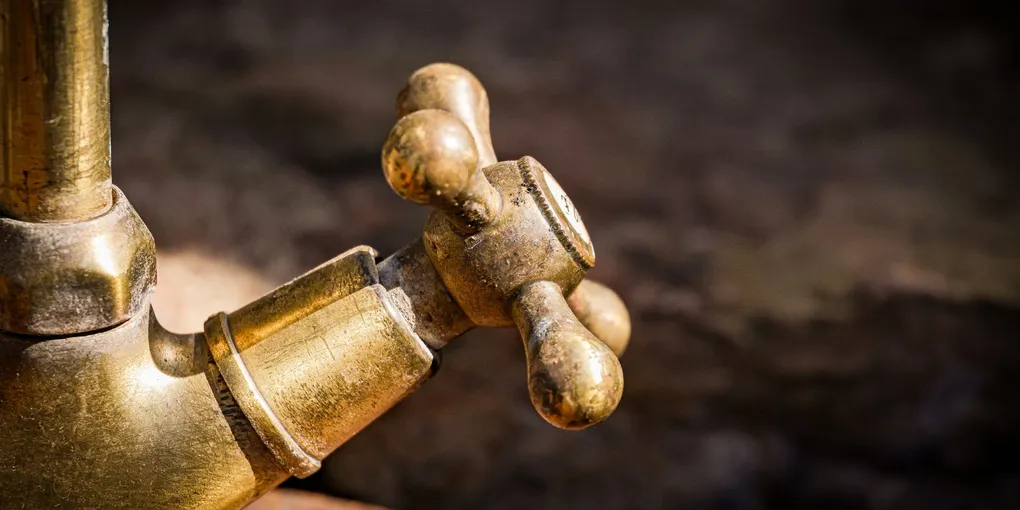
A loose kitchen faucet handle is almost always caused by a set screw that has vibrated loose. Pop the decorative cap off the top of the handle with a flathead screwdriver — underneath is a hex (Allen) screw (usually 3/32, 1/8, or 5/32 inch). Tighten it firmly. If the handle is still loose after tightening the set screw, the handle adapter is worn and needs replacement. No need to shut off the water just to tighten the set screw.
Frequently Asked Questions
Why do kitchen faucet handles become loose over time?
The most common cause is a set screw that has vibrated loose from the repeated motion of turning the faucet on and off. On older faucets, the stem nut or handle adapter can also wear down and no longer grip the cartridge or ball stem firmly. Less commonly, a cracked handle body is the culprit.
Where is the set screw on a kitchen faucet handle?
The set screw is almost always hidden beneath a decorative cap on the top of the handle. Use a flathead screwdriver or your fingernail to pry off the cap. Underneath you will find either a Phillips screw or, on most modern faucets, a hex (Allen) screw. Common Allen wrench sizes for faucet set screws are 3/32, 1/8, and 5/32 inch.
My faucet handle set screw is tight but the handle is still loose — what else could it be?
If the set screw is fully tightened and the handle still wobbles, the handle adapter (the plastic or brass piece that connects the handle to the cartridge stem) may be cracked or worn. You will need to remove the handle and inspect the adapter. Replacement adapters are available from faucet parts suppliers using your faucet brand and model number.
Do I need to shut off the water to tighten a loose faucet handle?
Tightening the set screw does not require shutting off the water — you are only tightening a screw, not opening the valve body. However, if the handle must be fully removed or the cartridge needs to be accessed, shut off the water at the valves under the sink before proceeding.
Can a loose faucet handle cause a drip?
Yes. A handle that wobbles on its stem can prevent the cartridge or valve from closing fully in the shut position, causing a slow drip from the spout. Tightening the handle often stops the drip at the same time it fixes the wobble.
How do I know if I need to replace the cartridge versus just tightening the handle?
If tightening the set screw fixes the wobble but the faucet still drips, or if the faucet does not turn off completely, the cartridge is the source of the problem. A loose handle and a leaking cartridge can occur together, and addressing the handle tightness is step one — if the drip persists afterward, cartridge replacement is the next step.
A loose kitchen faucet handle is almost always caused by a set screw that has vibrated loose. Pop the decorative cap off the top of the handle with a flathead screwdriver — underneath is a hex (Allen) screw (usually 3/32, 1/8, or 5/32 inch).
A kitchen faucet handle that wobbles, spins loosely, or has developed noticeable play is one of those small irritations that gets worse if ignored. Left too long, a loose handle can damage the cartridge beneath it and turn a five-minute fix into a more involved parts-and-labor repair. The good news is that the majority of loose handles are fixed with a single Allen wrench in under ten minutes. This guide covers every cause and fix.
What You Need
- Allen wrench set (metric and standard)
- Replacement faucet cartridge — if needed, order by brand and model
- Flathead screwdriver
- Phillips screwdriver
- Adjustable pliers or basin wrench
- Plumber’s grease
- Towel and bucket (if shutting off water)
- Needle-nose pliers
Step 1 — Find and Remove the Decorative Cap
Turn off the lights in the kitchen and look at the top of the faucet handle. There is almost always a small decorative cap covering the fastener — it may be labeled HOT, COLD, or a brand logo, or it may simply be a blank chrome or plastic disc.
Pry the cap off gently with a flathead screwdriver or your fingernail. Work around the edge rather than forcing from one spot — these caps snap or thread on and can crack if pried aggressively from a single point.
Set the cap aside where it cannot fall into the sink drain.
Step 2 — Tighten the Set Screw
Under the cap you will find the set screw. Most modern faucets (Moen, Delta, Kohler, American Standard) use an Allen (hex) set screw. Insert Allen wrenches of increasing size until you find the one that fits snugly without slipping — typically 3/32 inch, 1/8 inch, or 5/32 inch.
Turn the set screw clockwise to tighten. It should draw the handle firmly down onto the cartridge stem. After tightening, try to wiggle the handle — there should be no play. If the handle is still loose after fully tightening the screw, the set screw is bottomed out and either the threads are stripped or the handle adapter beneath it is worn.
If the set screw turns freely with no resistance (the threads are stripped), you have two options: use a slightly larger set screw (try the next size up), or replace the handle if the handle body threads are stripped.
Step 3 — Inspect the Handle Adapter
If the set screw is tight but the handle still has play, the issue is the handle adapter — the piece between the set screw and the cartridge stem. This adapter is often plastic and can crack or wear oval over time, so the set screw clamps it but the worn adapter still allows movement on the stem.
To inspect it, shut off the water at the valves under the sink (turn both hot and cold shut-off valves clockwise until they stop). Remove the set screw completely and pull the handle upward and off the stem. You will see the adapter as a separate piece, or it may be molded into the handle base.
Inspect for cracks, worn flats (the flat sides of the stem socket should be angular, not rounded), and any breakage. Order a replacement adapter by searching for your faucet model number plus “handle adapter” — most faucet brands sell these parts separately for under $15.
Step 4 — Check the Cartridge Nut (Single-Handle Faucets)
On single-handle kitchen faucets with a ball or cartridge mechanism, there is a large retaining nut or sleeve that holds the cartridge in the faucet body. If this nut has loosened, the entire cartridge and handle assembly can develop vertical wobble even when the set screw is tight.
With the handle removed, look at the top of the faucet body. You should see a large plastic or chrome nut. Grip it with adjustable pliers (wrap the jaws with tape to avoid scratching) and turn it clockwise to tighten. Do not overtighten — snug plus a quarter turn is sufficient.
Reinstall the handle, tighten the set screw, and test. If this nut was loose, tightening it often resolves wobble that the set screw alone could not fix.
Step 5 — Replace a Worn Cartridge
If the handle is now firm but the faucet drips or will not shut off completely, the cartridge valve is worn. Replacing a cartridge is a straightforward repair that takes about 30 minutes.
With the water off and the handle removed, pull the cartridge straight up and out of the faucet body — some require pliers to dislodge. Take the old cartridge to a plumbing supply store or photograph the brand and model markings to order a replacement. Moen, Delta, and Kohler all sell OEM replacement cartridges for their faucet lines.
Apply a thin coat of plumber’s grease to the new cartridge O-rings before insertion. Align the cartridge tabs with the slots in the faucet body and press it firmly into place. Some brands include a cartridge puller tool — if yours did, use it in reverse to seat the new cartridge. Reinstall the retaining nut, handle, set screw, and decorative cap. Turn the water back on slowly and test for leaks at the handle and at the spout.
Step 6 — Test and Verify
Turn the faucet on and off several times. The handle should feel firm and controlled with no wobble. The hot and cold operation should be smooth across the full range of motion. Check underneath the sink at the shut-off valves for any drips from your earlier water shut-off.
Reattach the decorative cap by pressing it firmly into place until it snaps or threading it clockwise.
Related Reading
- How to Fix a Leaky Faucet
- How to Replace a Kitchen Faucet
- How to Unclog a Kitchen Drain
- Plumber Cost — what it costs to hire out faucet repairs
- Handyman Cost Guide — typical handyman rates for kitchen fixes
- Pop off the decorative cap
Look for a small plastic or metal cap on the top or back of the handle — it may be a colored dot (red/blue for hot/cold) or a brand logo. Pry it off with a flathead screwdriver or your fingernail. Underneath is a screw recess. No need to shut off the water for this step.
- Tighten the set screw
The screw is usually a hex (Allen) socket — try 3/32, 1/8, or 5/32 inch Allen keys. Insert the key and turn clockwise until firmly snug; do not overtighten (you can crack a plastic handle body). Replace the cap and test the handle. For most faucets this is the complete fix — takes under 5 minutes.
- Inspect the handle adapter (if still loose)
If the set screw is tight but the handle still wobbles, the handle adapter has worn out. Turn off water at the shutoff valves under the sink. Remove the handle by pulling straight up after removing the set screw. Examine the plastic or brass adapter piece — cracks, stripped splines, or rounding of the grip surfaces mean it needs replacement. Order by faucet brand and model from Repair Clinic or the manufacturer.
- Check the cartridge nut or stem nut
On single-handle faucets, the cartridge is held by a retaining clip or nut visible once the handle is off. A loose cartridge nut allows the cartridge to rock, causing handle wobble even with a tight set screw. Tighten the nut with pliers or a deep socket. Do not overtighten — the cartridge needs to turn freely.
- Replace a worn cartridge (if dripping continues)
If the handle wobble is gone but the faucet still drips after tightening, replace the cartridge. Note the brand (Moen, Delta, Kohler, etc.) and find the exact model number on the faucet body or in the original manual. Moen cartridges pull straight out; Delta ball-style faucets require a ball, seats, and springs kit. Most cartridge swaps take 20-30 minutes and cost $15-40.
Free: 10-Point Home Maintenance Checklist
Prevent costly repairs with this seasonal checklist. Save hundreds every year by catching problems early.
Your checklist is ready!
Open Checklist →Something went wrong. View the checklist here.