How to Fix a Dripping Bathtub Faucet: Two-Handle and Single-Handle Repair (2026)
A dripping bathtub faucet wastes thousands of gallons per year and the fix is usually a worn washer or cartridge. This guide covers two-handle (stem/washer) faucets and single-handle (cartridge) faucets — including how to shut off the water and identify what needs replacing.
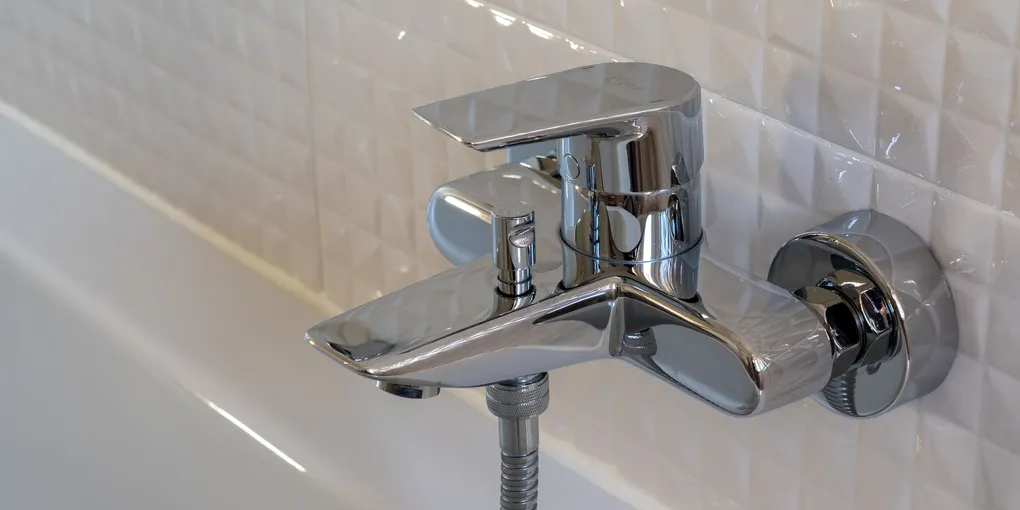
Two-handle bathtub faucet drip (the type with separate hot and cold handles): the culprit is almost always a worn seat washer on the handle side that's dripping — the same rubber washer fix as any compression faucet. Single-handle bathtub faucet drip: replace the cartridge inside the valve body — a $15–$30 part specific to your faucet brand. The trickiest part of any tub faucet repair is finding the shutoff: most tub supplies have a dedicated access panel in the adjacent wall or closet, or shut off at the main.
Frequently Asked Questions
How do I find the shutoff valve for a bathtub faucet?
Bathtub supply lines rarely have convenient under-sink shutoffs like kitchen and bathroom sinks do. Look for: (1) An access panel in the adjacent wall — the wall directly behind the tub valve (often in a closet, bedroom wall, or hallway) may have a removable panel or door that provides access to the supply lines. (2) A shutoff inside the tub surround wall — some builders install shutoffs inside the wall, accessible only after removing a tile or panel. (3) If no dedicated shutoff: shut off the main water supply for the house.
How do I identify my bathtub faucet brand and valve type?
Look at the faucet trim: Moen has a distinctive single-piece handle design, often with visible set screw behind the handle. Delta uses a different handle shape and often has a visible trim screw. Kohler handles may show the Kohler logo. For brand confirmation: search for the model number on the back of the handle, on the valve body inside the wall (accessible from the back panel), or by the trim plate shape and size. Search '[brand] + tub valve + [handle description]' to find the replacement cartridge.
My two-handle tub faucet drips from the spout even when both handles are fully off. Which side is it?
The side that is dripping is the one with the worn washer. Test: slowly turn on the cold handle slightly, then close it. If the drip temporarily increases or decreases: cold side. Repeat with hot. Usually only one side needs repair. If both sides drip: repair both while you have the faucet apart — the other washer is close to failure too.
What is a tub faucet cartridge and how do I replace it?
A cartridge is a self-contained valve mechanism — a cylinder or disc inside the valve body that controls water flow and temperature. When a single-handle faucet drips, the cartridge has worn internal seals. To replace: shut off water, remove the handle (usually a set screw under a decorative cap), remove the trim plate, and pull the old cartridge straight out (sometimes with pliers). Take the old cartridge to the hardware store for exact matching, or identify the brand and search for the replacement part number. Insert the new cartridge, reassemble in reverse.
The tub diverter (the pull handle that diverts to the showerhead) leaks when I use the shower. How do I fix it?
The diverter directs water from the tub spout to the showerhead by sealing the spout outlet. Diverter failure means water dribbles from the tub spout while the shower is running. Most tub spouts with diverters are replaced entirely — unscrew the spout from the supply nipple (turn counterclockwise), take it to the hardware store for matching, and install the new one with thread sealant. Tub spouts are $15–$40 and a 10-minute fix.
Two-handle bathtub faucet drip (the type with separate hot and cold handles): the culprit is almost always a worn seat washer on the handle side that’s dripping — the same rubber washer fix as any compression faucet. Single-handle bathtub faucet drip: replace the cartridge inside the valve body — a $15–$30 part specific to your faucet brand.
Bathtub faucet repairs follow the same logic as any faucet — just with different access challenges.
What you need
- Flathead and Phillips screwdrivers
- Adjustable wrench or pliers (with tape to protect chrome)
- Replacement washer assortment (for two-handle/compression faucets)
- Replacement cartridge (for single-handle faucets — brand and model specific)
- Plumber’s grease
- Needle-nose pliers
Two-handle faucet: seat washer replacement
Step 1: Shut off water and drain
Shut off the supply (access panel, dedicated shutoff, or main). Turn on the faucet to drain pressure.
Step 2: Remove the handle
Pry off the decorative cap on the handle. Remove the screw underneath. Pull the handle off.
Step 3: Remove the stem
Grip the stem hex with a deep socket or pliers. Turn counterclockwise to unscrew the stem from the valve body. Pull the stem out.
Step 4: Replace the washer
At the bottom of the stem: a rubber washer held by a brass screw. Replace it with a matching washer from an assortment pack. Coat with plumber’s grease.
Reinstall the stem, handle, and cap. Restore water.
Single-handle faucet: cartridge replacement
Step 1: Remove the handle and trim
Pry off the decorative cap, remove the handle screw, pull the handle off. Remove the trim plate (screws or snap-fit).
Step 2: Remove the cartridge
Note the orientation before removing (photo it). Grip the cartridge stem with pliers and pull straight out. Some cartridges have a retaining clip — remove the clip first.
Step 3: Install new cartridge
Insert the new cartridge in the same orientation. Reinstall the retaining clip if present. Reassemble the trim and handle.
Restore water. Test for leaks at the trim plate and at the tub spout.
Related guides
- How to Fix a Leaky Faucet — sink faucet washer and cartridge repairs (same principles)
- How to Replace a Shower Head — showerhead upgrade while the supply is accessible
- How to Caulk a Bathtub — tub surround sealing while doing repairs
- Shut off the water supply
Look for an access panel in the wall behind the tub valve (often in an adjacent closet or hallway). Shut off the hot and cold supply valves inside the panel. If no panel exists: shut off the main house water supply. Turn on the faucet to release pressure and confirm flow has stopped.
- Remove the handle (two-handle faucet)
Pry off the decorative cap on top of the handle with a flathead screwdriver. Remove the screw underneath. Pull the handle straight off the stem — it may require gentle wiggling. Set the cap and screw aside where they won't fall into the drain.
- Replace the seat washer (two-handle faucet)
Grip the stem hex with a deep socket or pliers and turn counterclockwise to unscrew the stem from the valve body. At the bottom of the stem is a rubber washer held by a brass screw — remove the screw and swap in a matching replacement washer from an assortment pack. Coat lightly with plumber's grease. Reinstall the stem, handle, and cap.
- Replace the cartridge (single-handle faucet)
Remove the decorative cap and handle screw, pull the handle off, and remove the trim plate. Photograph the cartridge orientation before removing — note which way it faces. Use pliers to pull the cartridge straight out (remove the retaining clip first if present). Take the old cartridge to the hardware store to match by brand and model, or order by the faucet brand and model number.
- Reassemble and test
Insert the new cartridge in the same orientation as the old one. Reinstall the retaining clip if present. Reassemble the trim plate and handle. Restore water at the supply valve. Test for dripping and check for any leaks at the handle. Turn both handles (or the full range on a single-handle) to confirm smooth operation.
Free: 10-Point Home Maintenance Checklist
Prevent costly repairs with this seasonal checklist. Save hundreds every year by catching problems early.
Your checklist is ready!
Open Checklist →Something went wrong. View the checklist here.