How to Fix a Broken Bathroom Floor Tile
Replace a single cracked or broken bathroom floor tile without disturbing surrounding tiles using basic tools and matching grout for a seamless repair.
Replacing a cracked bathroom floor tile: (1) Grind out the grout lines around the tile with an oscillating tool and grout removal blade. (2) Score an X across the cracked tile with a grinder or angle grinder to break it into pieces. Chisel out pieces with a cold chisel, working from the center outward. (3) Scrape the old thinset off the subfloor until flat. Test-fit the new tile — it should sit flush with surrounding tiles. (4) Apply thinset with a notched trowel, set the tile with spacers matching existing gaps, and press firmly. (5) Let cure 24 hours. Grout with color-matched grout using a rubber float. (6) Seal grout after 72-hour cure. Getting a color match for the tile is the hardest part — bring the old tile fragment or a photo to a tile store. Cut a spare from under a toilet base if you cannot find a match.
Frequently Asked Questions
Do I need to replace the whole floor if only one tile is broken?
No. A single broken tile can be removed and replaced without disturbing adjacent tiles if you work carefully with the right tools.
How do I find a matching replacement tile?
Check if you have leftover tiles from the original installation. If not, take a tile shard to a tile supplier and match the size, color, and finish as closely as possible.
What is the best tool to remove a broken tile without cracking neighbors?
An oscillating multi-tool with a grout removal blade is the safest option for clearing grout lines, followed by a cold chisel and hammer to lift the tile shards.
How long do I need to wait before grouting after setting the new tile?
Allow the thin-set mortar to cure for at least 24 hours before applying grout so the tile does not shift during the grouting process.
What if the subfloor under the broken tile is damaged?
If the subfloor is soft, spongy, or moldy, repair or replace the affected section before setting the new tile or the new tile will crack again.
Can I use sanded or unsanded grout for a bathroom floor?
Use sanded grout for joints wider than 1/8 inch, which is typical for most floor tile installations, and unsanded grout for narrower joints common in wall tiles.
What do I do when I cannot find a matching replacement tile?
Three options: (1) Donor tile — remove a tile from a hidden location such as under the toilet base or behind a vanity and use it for the visible repair. Install a close-match tile in the hidden donor location where the slight difference will not be noticed. This gives a perfect match where it matters. (2) Accent tile — use the replacement position to introduce a deliberate accent tile in a contrasting color or decorative pattern. Done intentionally with a complementary design, this reads as a design choice rather than a mismatch. (3) Row replacement — if the broken tile is in a prominent central area, remove the entire row it belongs to and replace with a complementary new tile bordered by a transition strip. Option 1 is the cleanest solution when a donor location exists. Bring a tile shard to a tile specialty store, not a home center — specialty stores have access to wider inventories and can sometimes identify discontinued lines.
Can I tile over the cracked tile instead of removing it?
Not recommended for floor repairs. A cracked floor tile indicates either a point-impact break or subfloor movement — and overlaying a new tile leaves the void crack beneath where it will continue to grow under foot traffic, eventually cracking the new tile too. Floor overlay also raises the tile height, creating a trip-hazard transition with adjacent tiles. On walls, overlay is more defensible if the existing surface is solid and flat, but on floors, removal and replacement is the correct approach. Fix any subfloor softness or flex before setting the replacement tile or the problem will recur.
Replacing a cracked bathroom floor tile: (1) Grind out the grout lines around the tile with an oscillating tool and grout removal blade. (2) Score an X across the cracked tile with a grinder or angle grinder to break it into pieces.
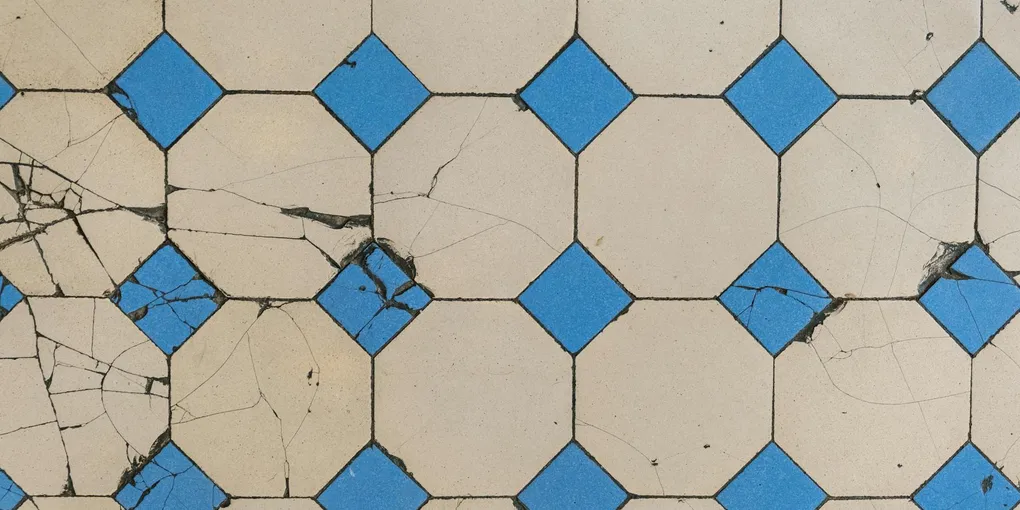
A single cracked or broken bathroom floor tile is an invitation for water to reach the subfloor below. In a bathroom where moisture is constant, that water can cause mold, rot, and structural damage far more expensive than a simple tile replacement. The good news is that swapping out one damaged tile is an approachable DIY project that most homeowners can complete in a weekend with patience and the right technique.
Tools and Materials You Will Need
- Replacement tile (matching size, color, and finish)
- Grout matching existing floor color
- Oscillating multi-tool with grout removal blade, or manual grout saw
- Cold chisel and hammer
- Putty knife or margin trowel
- Floor-grade thin-set mortar
- Notched trowel (1/4 inch notches)
- Grout float
- Grout sponge and clean water
- Painter tape
- Safety glasses and gloves
Before anything else, source your replacement tile. Bring a shard of the broken tile to a tile supplier and match it as closely as possible in size, thickness, color, and surface texture. Even a slight thickness difference will create a lippage (a raised edge) that is both a trip hazard and an eyesore.
An oscillating multi-tool with a grout blade is the safest way to clear grout lines without chipping adjacent tiles. A tile grout float and sponge kit makes the finishing step much cleaner and easier.
Step 1: Protect Surrounding Tiles
Apply painter tape along the grout lines on all four sides of the broken tile. This protects adjacent tiles from chisel slips and gives you a clean visual boundary to work within.
Step 2: Remove the Grout
Using the oscillating multi-tool with a grout blade, cut along all four grout lines surrounding the broken tile. Remove as much grout as possible from the joint without cutting into the neighboring tiles. Work slowly and let the tool do the work — forcing it increases the risk of cracking an adjacent tile. Alternatively, use a manual grout saw for this step if you prefer more tactile control.
Step 3: Break Out the Damaged Tile
Put on safety glasses before this step. Place the tip of your cold chisel in the center of the broken tile and tap firmly with the hammer. Work from the center outward, breaking the tile into manageable pieces and prying them up with the chisel. Remove all pieces carefully, working toward the edges to avoid undermining the neighboring tiles.
Step 4: Clean the Substrate
Use your putty knife or margin trowel to scrape the old thin-set mortar from the floor. The substrate must be clean, flat, and solid before you set the new tile. If the old mortar resists scraping, a handheld angle grinder with a cup wheel removes it quickly. Press on the surrounding area — if it feels soft or hollow, investigate for water damage before proceeding.
Step 5: Apply Thin-Set Mortar
Mix floor-grade thin-set mortar to a peanut butter consistency. Spread it over the clean substrate with the flat side of your notched trowel, then comb it into ridges using the notched side. The ridges ensure full coverage and good adhesion. Apply mortar to an area slightly larger than the tile footprint.
Step 6: Set the New Tile
Press the new tile firmly into the mortar, centering it in the opening. Twist it slightly back and forth to seat it into the ridges. Use a rubber mallet and a piece of scrap wood to tap it level with the surrounding tiles — check level in both directions and compare with adjacent tile heights. Insert tile spacers on all four sides to maintain consistent grout joint width.
Let the thin-set cure for a full 24 hours. Do not walk on the new tile during this period.
Step 7: Apply Grout
Remove the tile spacers and painter tape. Mix your grout according to label directions. Using the grout float held at a 45-degree angle, press grout firmly into all four joints around the new tile, working diagonally across the joint lines to pack them completely. Remove excess grout from the tile face with the float edge held nearly vertical.
Wait 15 to 20 minutes, then use a damp grout sponge to clean haze from the tile surface, rinsing the sponge frequently. Shape the grout joints with the sponge edge to match the profile of surrounding joints. Allow grout to cure 72 hours before heavy foot traffic or wet mopping.
Preventing Future Tile Damage
Tile breaks most often from point impact (dropping heavy objects) or from a soft or cracked subfloor that flexes underfoot. Address any subfloor bounce before replacement to avoid a repeat repair, and apply a grout sealer annually to prevent moisture infiltration through the joints.
Related guides
- How to Fix a Floor Tile That Is Loose — use epoxy injection to reattach a tile that’s hollow but not yet broken
- How to Grout Floor Tile — regrout the repaired area to match surrounding tile
- Protect Surrounding Tiles
Apply painter tape along the grout lines on all four sides of the broken tile. This protects adjacent tiles from chisel slips and gives you a clean visual boundary to work within.
- Remove the Grout
Using the oscillating multi-tool with a grout blade, cut along all four grout lines surrounding the broken tile. Remove as much grout as possible from the joint without cutting into the neighboring tiles.
- Break Out the Damaged Tile
Put on safety glasses before this step. Place the tip of your cold chisel in the center of the broken tile and tap firmly with the hammer. Work from the center outward, breaking the tile into manageable pieces and prying them up with the chisel.
- Clean the Substrate
Use your putty knife or margin trowel to scrape the old thin-set mortar from the floor. The substrate must be clean, flat, and solid before you set the new tile.
- Apply Thin-Set Mortar
Mix floor-grade thin-set mortar to a peanut butter consistency. Spread it over the clean substrate with the flat side of your notched trowel, then comb it into ridges using the notched side. The ridges ensure full coverage and good adhesion.
- Set the New Tile
Press the new tile firmly into the mortar, centering it in the opening. Twist it slightly back and forth to seat it into the ridges.
Free: 10-Point Home Maintenance Checklist
Prevent costly repairs with this seasonal checklist. Save hundreds every year by catching problems early.
Your checklist is ready!
Open Checklist →Something went wrong. View the checklist here.