How to Fix a Cracked Plaster Wall: Hairline to Structural Repairs
Repair cracked plaster walls using mesh tape, setting compound, and skim coat techniques — from hairline cracks to large structural failures — and restore a smooth paintable surface.
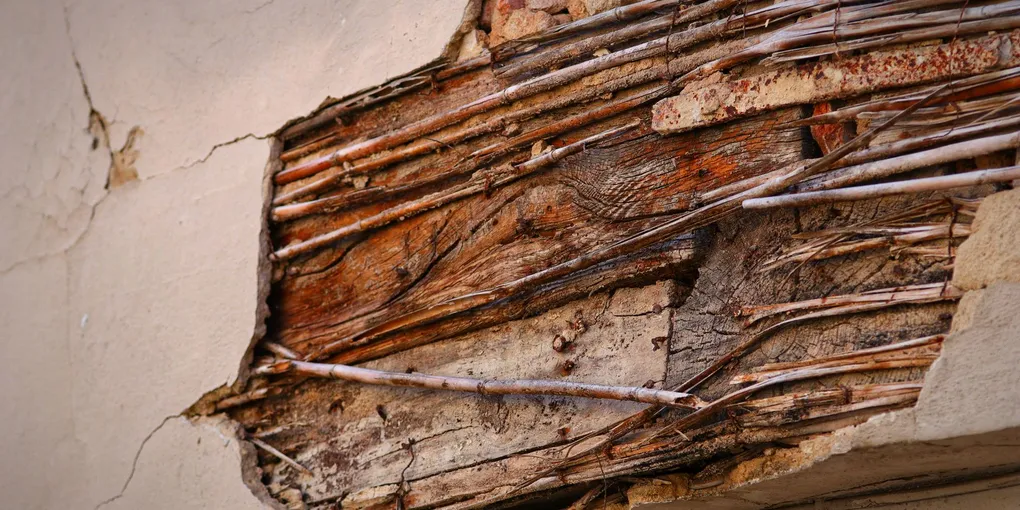
Plaster walls are one of the distinctive features of homes built before 1960, and they are genuinely superior to drywall in many ways — harder, denser, more soundproof, and capable of holding paint beautifully for decades. But they crack.
Plaster walls are one of the distinctive features of homes built before 1960, and they are genuinely superior to drywall in many ways — harder, denser, more soundproof, and capable of holding paint beautifully for decades. But they crack. The three-coat plaster system (scratch coat, brown coat, and finish coat) that creates this hard surface relies on mechanical keys through wood lath — and those keys can fail, the wood can move, and the rigid plaster cannot flex. Understanding what type of crack you have is the first step to a repair that holds.
This guide covers the full range of plaster crack repairs: hairline cracks that only need a skim, medium cracks needing tape and compound, and delaminated sections that require removal and rebuilding.
What You Need
Plaster repair requires slightly different materials than standard drywall work — the harder surface demands better tools and stronger compounds.
- USG Durabond 45 Setting-Type Joint Compound 25lb — A non-shrinking chemically-setting compound ideal for filling deep cracks and re-anchoring loose plaster.
- USG Sheetrock All-Purpose Joint Compound 4.5-gallon — Pre-mixed compound for finish coats and skim coating over repaired areas.
- FibaTape Self-Adhesive Fiberglass Mesh Tape 2-inch x 150 ft — Reinforces crack repairs to prevent re-cracking through the new compound surface.
- OX Tools Professional Stainless Steel Finishing Trowel 14-inch — A wide finishing trowel is essential for skim coat work over large areas.
- Hyde Tools 6-Piece Flexible Putty Knife Set — A range of blade widths for applying and feathering compound at different stages.
- 3M SandBlaster Pro Sanding Sponge 100-Grit — Sanding sponges conform to the texture of old plaster and avoid creating flat spots.
Step 1: Assess the Crack Before You Touch It
The most expensive mistake in plaster repair is spending hours filling a crack that will re-open in weeks because the underlying cause was not addressed. Spend five minutes on assessment before you open any compound.
Tap test: Use your knuckle to tap the plaster in a 6-inch radius around the crack. A solid, dense sound is good — the plaster is still bonded to the lath. A hollow drum sound means the plaster keys have broken and the section is delaminating. Delaminated plaster cannot be cosmetically repaired — it must be removed and rebuilt (see Step 4).
Movement test: Press gently on both sides of the crack. If the plaster moves or flexes, the section is loose. If it is rigid and stationary, the crack is cosmetic (the plaster is not going anywhere).
Width and displacement: Use a coin edge or a business card to gauge crack width.
- Under 1/16 inch with no displacement: hairline, cosmetic repair
- 1/16 to 1/4 inch with no displacement: medium crack, tape and compound repair
- Over 1/4 inch or with one side higher than the other: investigate for structural causes before patching
Check for active movement: Mark the ends of the crack with pencil and date it. Check back in 30 days. If the crack has extended, the underlying movement has not stabilized — patching now means repatching later.
Step 2: Repair Hairline Cracks
Hairline cracks (under 1/16 inch) can often be fixed in a single afternoon with no tape required.
Preparation:
- Use a can opener or a 5-in-1 tool to widen the hairline crack slightly into a “V” shape — you need space for the compound to grip.
- Blow out or vacuum the loose dust and plaster particles from the crack.
- Dampen the crack with a wet paintbrush — dry plaster will draw moisture out of the compound too quickly and cause it to shrink and crack again.
Filling:
- Mix Durabond 45 to a peanut butter consistency — it should hold its shape without slumping.
- Force the compound into the crack with a 3-inch putty knife, working it into the full depth of the V-groove.
- Skim the surface flush with the wall. Durabond does not sand easily once cured, so take your time getting it level.
- Let cure completely (about 45 minutes for Durabond 45).
- Apply a finish coat of all-purpose pre-mixed compound, feathering 3 to 4 inches beyond the crack on each side.
- Let dry 24 hours, sand lightly with 100-grit, and prime.
Step 3: Repair Medium Cracks with Mesh Tape
For cracks in the 1/16 to 1/4 inch range, the mesh tape reinforcement layer is what makes the repair permanent rather than cosmetic.
Step-by-step:
- Widen the crack to a V-shape as described above.
- Apply a thin first layer of all-purpose compound over the crack using a 4-inch knife, slightly wider than the tape you will use.
- While the compound is still wet, center the self-adhesive mesh tape over the crack and press it in firmly.
- Apply a second coat of compound over the tape, embedding it fully. Feather the edges 4 to 6 inches on each side. The tape should not be visible under this coat — if it is, apply more compound.
- Let dry completely (24 hours minimum).
- Apply a second finish coat, widening the feather to 8 to 10 inches. Joint compound shrinks slightly as it dries — this wider second coat fills the low spots created by the first coat shrinkage.
- Dry, sand with 120-grit, then 150-grit. The goal is a smooth surface with no visible edges from the compound layers — run your hand over it; you should feel no bump or ridge.
- Prime with PVA primer before finish painting.
Tip on sanding: Wear a dust mask — old plaster dust can contain crystalline silica. Sanding sponges work better than sheet sandpaper on plaster because they conform to slight surface undulations without creating flat pockets.
Step 4: Remove and Rebuild Delaminated Plaster
Hollow-sounding plaster — sections where the keys have broken and the plaster is only loosely attached — cannot be saved with surface compound. Painting over loose plaster simply adds the weight of the paint to an already-failing bond and accelerates the eventual fall.
Safe removal:
- Tap the wall to map the full extent of the loose section. Mark the perimeter with a pencil.
- Score along your marked perimeter with a utility knife to create a clean break and prevent cracking the surrounding sound plaster.
- Chisel carefully from the crack outward, keeping the tool at a low angle to avoid gouging the lath.
- Remove all loose plaster down to bare lath.
- If the wood lath is rotted, damaged, or missing, you will need to cut it back and attach a piece of drywall backer board between the studs before proceeding.
Rebuilding with setting compound:
For sections under 12 inches square, you can rebuild directly with Durabond without traditional base coats.
- Apply a scratch coat of Durabond to the bare lath, pressing it firmly through the lath gaps to form new keys. Score a crosshatch pattern into the wet surface with a comb or notched trowel.
- Let cure fully.
- Apply a second (brown) coat of Durabond, bringing the surface to within 1/8 inch of the surrounding plaster level.
- Score again and let cure.
- Apply a finish coat of pre-mixed all-purpose compound to bring the surface flush with the surrounding plaster. Feather the edges generously.
For large areas of delamination (more than a few square feet), patching with a matching piece of drywall — cut to fit between the studs, shimmed flush with the surrounding plaster face, and taped at the seams — is faster and equally durable.
Step 5: Apply a Skim Coat for a Smooth Finish
When the repaired area is significantly rougher than the surrounding wall, or when you have made multiple repairs in a large area, a skim coat over the entire affected section creates a uniform surface for painting.
Skim coat technique:
This is the hardest step in plaster work to master. The goal is to apply a thin, flat layer of compound and then immediately remove nearly all of it, leaving just enough to fill the texture without building up thickness.
- Thin all-purpose compound slightly with water until it has a consistency like thick cream — it should spread easily and self-level somewhat.
- Load the wide trowel (12 to 14 inches) and apply the compound to the wall in broad, overlapping arcs. Press firmly and keep the trowel moving.
- Immediately come back over the wet compound with the trowel held at a very shallow angle (10 to 15 degrees to the wall surface). Long, slow strokes with firm pressure. This step removes the excess while keeping the compound in the low spots.
- Work in sections of about 3 square feet at a time — compound becomes harder to work as it begins to set.
- Let dry completely (24 to 48 hours for a skim coat).
- Sand with 100-grit on a pole sander, then finish with 150-grit.
- Feel the surface with the flat of your hand in raking light — you will feel ridges and high spots you cannot easily see. Mark them with pencil and knock them down with a light pass of the trowel or a sanding block.
- A second skim coat may be needed over the first. Repeat the process; the second coat goes on over the sanded first coat.
Light check: Hold a work light at a steep angle to the wall surface. Any imperfection shows up as a shadow in raking light. This is the professional’s method for checking skim coat quality before priming.
Step 6: Prime and Paint
Repaired plaster absorbs primer and paint at a different rate than the undamaged surface, which causes flash — a visible sheen difference between the repair and the surrounding wall. Priming eliminates this.
Priming:
- Apply PVA drywall primer or a standard interior latex primer to the entire repaired area and at least 6 inches into the undamaged surrounding plaster.
- Let dry fully per the manufacturer’s instructions.
- Sand lightly with 220-grit after the primer dries if the surface feels rough.
- For large repaired areas, prime the entire wall from corner to corner to ensure a consistent sheen.
Painting:
Use the same sheen level as the existing wall. Flat paint is most forgiving of minor texture differences; eggshell and satin sheens are less forgiving. If you are repainting the entire room, you have the most flexibility to get a perfectly matched surface.
Apply two finish coats for best coverage, letting each dry fully between coats. Roll the paint in a “W” pattern and back-roll to eliminate lap marks.
Related Reading
- How to Patch a Drywall Hole: Small, Medium, and Large
- How to Skim Coat a Wall for a Smooth Finish
- How to Paint a Room Like a Professional: Prep, Cut-In, and Roll
- Assess the Crack Before You Touch It
The most expensive mistake in plaster repair is spending hours filling a crack that will re-open in weeks because the underlying cause was not addressed. Spend five minutes on assessment before you open any compound.
- Repair Hairline Cracks
Hairline cracks (under 1/16 inch) can often be fixed in a single afternoon with no tape required.
- Repair Medium Cracks with Mesh Tape
For cracks in the 1/16 to 1/4 inch range, the mesh tape reinforcement layer is what makes the repair permanent rather than cosmetic.
- Remove and Rebuild Delaminated Plaster
Hollow-sounding plaster — sections where the keys have broken and the plaster is only loosely attached — cannot be saved with surface compound.
- Apply a Skim Coat for a Smooth Finish
When the repaired area is significantly rougher than the surrounding wall, or when you have made multiple repairs in a large area, a skim coat over the entire affected section creates a uniform surface for painting.
- Prime and Paint
Repaired plaster absorbs primer and paint at a different rate than the undamaged surface, which causes flash — a visible sheen difference between the repair and the surrounding wall. Priming eliminates this.
Free: 10-Point Home Maintenance Checklist
Prevent costly repairs with this seasonal checklist. Save hundreds every year by catching problems early.
Your checklist is ready!
Open Checklist →Something went wrong. View the checklist here.