How to Fix a Broken Laundry Room Shelf
Repair a sagging or collapsed laundry room utility shelf by replacing brackets and anchors so it holds full loads reliably again.
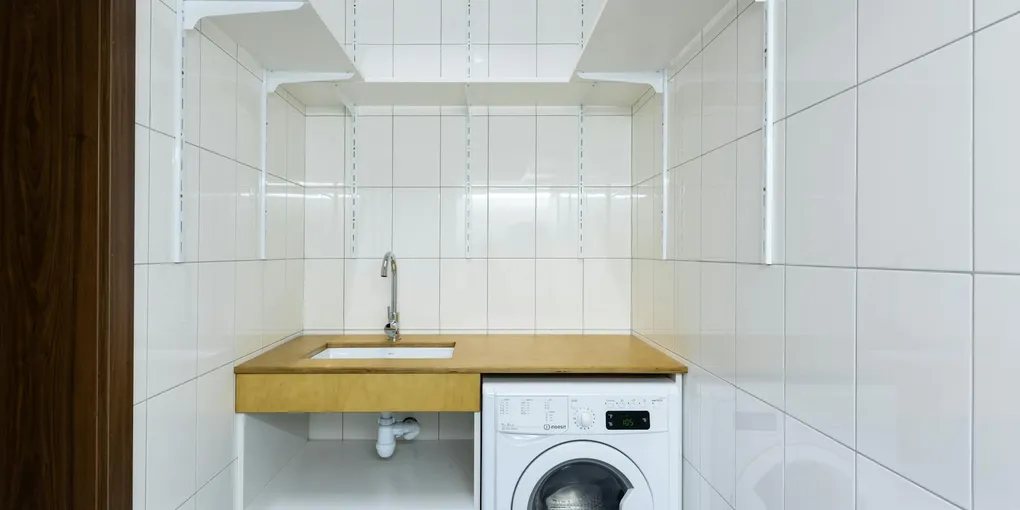
Laundry rooms are hard on wall-mounted shelving. The combination of weight from heavy detergent bottles, humidity from the washer and dryer, and the vibration from running appliances conspires against brackets and anchors over time.
Laundry rooms are hard on wall-mounted shelving. The combination of weight from heavy detergent bottles, humidity from the washer and dryer, and the vibration from running appliances conspires against brackets and anchors over time. When a shelf collapses, it usually means the anchors were undersized for the load, were not hitting studs, or have corroded and failed. The good news is that the repair is straightforward and gives you the opportunity to install the shelf correctly the second time — so it will not fail again.
Diagnosing What Failed
Before buying materials, understand why the shelf came down:
Anchor failure in drywall: The most common cause. If the wall screw holes are stripped and oversize, with the drywall crumbling around them, the original anchors were not adequate for the weight.
Missed studs entirely: If the old screws pulled cleanly out of solid drywall, they were never in studs. The drywall held for a while, then gave way.
Bracket failure: If the brackets themselves bent, cracked, or pulled away from the shelf board (rather than from the wall), the brackets were undersized for the load.
Wall damage: If the drywall itself is crumbled or waterlogged, you may need to patch the wall before reinstalling the shelf.
Take a few minutes to map the old screw holes and understand what failed. This dictates your repair approach.
Tools and Materials
- Stud finder
- Pencil and tape measure
- Level
- Drill with bits (including a bit sized for your anchor type)
- Screwdriver or drill driver
- Heavy-duty L-brackets or shelf brackets — zinc-plated or powder-coated for humidity resistance
- 3-inch wood screws for stud mounting
- Heavy-duty toggle bolts or snap toggles for non-stud locations
- Shelf board (reuse the old one if sound, or cut a new one from 3/4-inch plywood)
- Spackling compound and sandpaper (to patch old anchor holes)
- Painter’s tape
Step 1: Remove All Old Hardware and Patch the Wall
Remove any remaining brackets, anchors, and screws from the wall. Use pliers to pull out any plastic anchors that are still embedded in the drywall.
Fill the old holes with spackling compound, pressing it in flush with the wall surface. Let it dry, sand smooth, and apply a second coat if needed. In a utility laundry room, you do not need to paint over the patches — just let them dry.
This is the time to look at the wall carefully for any moisture damage or soft spots. Press on the drywall around the old hole locations. If it feels soft, crumbles, or has discoloration, you have water damage from the laundry room humidity. Repair or replace the damaged drywall section before remounting the shelf.
Step 2: Locate and Mark the Studs
Use your stud finder to locate studs along the wall where the shelf will go. Mark the stud centers with tape or pencil. In most construction, studs are spaced 16 inches on center, so once you find one, you can measure to find the adjacent ones.
Confirm stud locations with a small pilot hole before committing to your bracket position. The drill should hit resistance and pull back wood dust, not loose drywall powder.
Ideally, each bracket will land on a stud. If the shelf span requires more bracket locations than available studs, use heavy-duty toggle bolts at the non-stud positions — not standard plastic anchors.
Step 3: Plan the Bracket Layout
For a standard laundry shelf holding detergent and supplies:
- Use at least two brackets for shelves up to 36 inches wide, three for 48 inches or wider.
- Space the outer brackets no more than 24 inches from the ends of the shelf.
- Position brackets no more than 24 inches apart for a 3/4-inch plywood shelf, 16 inches apart for 1/2-inch plywood.
Use your tape measure and pencil to mark the exact screw hole positions for each bracket on the wall. Hold each bracket in position and mark through the holes. Use a level to confirm all bracket mounting heights are consistent before drilling.
Step 4: Mount the Brackets
For stud mounting: Drill pilot holes sized for your wood screws (typically 3/32-inch for 3-inch screws). Drive 3-inch coarse-thread screws through the bracket holes into the studs. The screws should be long enough to penetrate the stud at least 1.5 inches. Hold each bracket with one screw, confirm it is level, then add the second screw.
For drywall-only locations: Drill holes per the toggle bolt instructions (typically 3/8-inch or 1/2-inch for common toggle sizes). Insert the toggle bolts, tighten until snug, and stop before overtightening — overtightening crushes the drywall. Snap toggles are faster to install and hold well.
Check each bracket with a level after mounting. All brackets should be at the same height (use your pencil line as a reference) and plumb (vertical arms pointing straight up).
Step 5: Install the Shelf Board
Set the shelf board on the mounted brackets. If you are reusing the old board, inspect it once more before fastening it — check for any warping that might cause the board to rock on the brackets.
Drive screws up through the bracket mounting holes into the underside of the shelf board. Use screws long enough to bite into the wood without going through the top of the shelf (typically 1-inch to 1.25-inch screws for a 3/4-inch board). This fastens the shelf to the brackets and prevents it from sliding off.
Step 6: Load Test
Before piling all your laundry supplies back on, load the shelf gradually and check for any flex or movement. Press down firmly at the center of the shelf with both hands. There should be minimal deflection. If the shelf flexes more than 1/4 inch under your body weight, add a center bracket.
A properly mounted heavy-duty shelf with stud-anchored brackets should feel rock solid under a full load. If it does not, revisit your stud locations and anchor selection before declaring the job done.
Maintaining Your Laundry Room Shelf
- Wipe down the shelf and brackets with a dry cloth periodically to remove detergent dust, which is mildly corrosive over time.
- Do not store full gallon jugs of water softener salt on a standard wall shelf — that weight is better placed on the floor.
- If you notice a bracket starting to pull away from the wall, tighten the screws immediately before the load shifts and causes a full failure.
With solid stud anchoring and the right bracket hardware, a laundry room shelf installed using the method above will outlast the appliances below it. Take the extra 10 minutes to use a stud finder and level, and you will never have to repeat this repair.
- Remove All Old Hardware and Patch the Wall
Remove any remaining brackets, anchors, and screws from the wall. Use pliers to pull out any plastic anchors that are still embedded in the drywall.
- Locate and Mark the Studs
Use your stud finder to locate studs along the wall where the shelf will go. Mark the stud centers with tape or pencil. In most construction, studs are spaced 16 inches on center, so once you find one, you can measure to find the adjacent ones.
- Plan the Bracket Layout
For a standard laundry shelf holding detergent and supplies:
- Mount the Brackets
For stud mounting: Drill pilot holes sized for your wood screws (typically 3/32-inch for 3-inch screws). Drive 3-inch coarse-thread screws through the bracket holes into the studs.
- Install the Shelf Board
Set the shelf board on the mounted brackets. If you are reusing the old board, inspect it once more before fastening it — check for any warping that might cause the board to rock on the brackets.
- Load Test
Before piling all your laundry supplies back on, load the shelf gradually and check for any flex or movement. Press down firmly at the center of the shelf with both hands. There should be minimal deflection.
Free: 10-Point Home Maintenance Checklist
Prevent costly repairs with this seasonal checklist. Save hundreds every year by catching problems early.
Your checklist is ready!
Open Checklist →Something went wrong. View the checklist here.